

There are many reasons for removing the background from a photo with different tools. Today in this article, we are going to let you know how to remove white background in Photoshop. Suppose you need a neat and clear appearance to the logo of your company/ for client’s purpose or you need to clip images to make a collage.
So, now you have the solution to all your problems in just one software which is known as Adobe Photoshop. Before Photoshop was created, it was tough, or you can say the task of removing background from photos was next to impossible. But now, with some practice and skills, it has become an easy task.
Why is this service needed?
If you are an entrepreneur, a freelance photographer or an expert photo retoucher, then this service is a must for you. As nowadays in any field, photographs play a significant role. It has become a crucial part of every aspect, starting from the marketing of your business to increase sales by attracting customers better.
So the quality of the pictures is also outstanding as good quality photographs a positive vibe and a great message to the customers. A photograph must go through the image manipulation service, and the most demanding service in the editing industry right now is white background removal to enhance the picture quality.
The white background service removal is the most used service in photo altering. Through utilizing this system, we can get rid of any unwanted part of the pictures and delete unnecessary articles this will eventually lead to more appealing photographs. Removing the white background from an image in Photoshop is a natural process.
Reasons for removing the white background in photoshop are mentioned below:
1. If you are working with several, overlapping pictures or wants to attach/add your picture on a page which does not have a white backdground, then the removal of white background in Photoshop comes in.
2. Customers do not always prefer to see or want a white background for their product or photos background. They tend to attract more to the colorful, lively backgrounds as in many cases, the white background looks boorish and monotonous.
3. If you are working with watercolors, then you would like to remove the white canvas art from your photos. The unnecessary white backdrop distracts the audience from the main focus.
4. If you are preparing for a presentation, and made your slides into Powerpoint and used the color white as the backdrop of your slides, you have made a great mistake. As we all know, project lights reflect on the white screen, and then it becomes difficult for the audience to look at the screen for a long time with concentration.
5. Often in Photoshop, during editing, the white background looks yellowish; this results in making the picture duller. So in Photoshop, you can fix the problem by removing the white background instantly.
HOW TO REMOVE WHITE BACKGROUND IN PHOTOSHOP
There are solutions available to fix this annoying white background issue. In photoshop, there are varieties of tools that are available. These can aid you to get you the pictures cut perfectly and add it to another background making it crisp and high-end looking.
The procedure of removing the white background in photoshop is described below:
In this tutorial, you will learn how to separate the white background from your photos with the help of Adobe Photoshop.
OPEN THE IMAGE
Once you have downloaded and saved the image file that you would like to edit, open it in Photoshop. After you have done selecting the image from the file folders, place it in the center of the drawing board of Photoshop. This will help you to make the editing process easily accessible.
UNLOCK THE LAYER PANELS
Secondly, after you have placed the image on the center of the artboard, look at the top right side of the screen. If your image is not previously edited it will have only one layer named as background. Then click on this option and “layer from background”. It will give you a new layer window. This means you have unlocked the layer panel. Then press okay by leaving the options pre-sets. Set the “background” at “Layer 0”.
SELECT MAGIC ERASER
After unlocking the layer panel, go to the eraser tool option to select a tool that can erase anything. In the 3rd eraser tab hold the eraser tool icon and click to gain access to the tool named “magic eraser”.
ADJUST THE SETTINGS
After you have done accessing the magic eraser, there will be some setting options unlocked in the above menu bar.
Choose the below-mentioned preferences:
Tolerance: 30
Anti-Alias: checked
Opacity: 100%
*If your image is very light in the area, then you should opt for background eraser tool instead of a magic eraser. Here, step one and two will be the same just in step 3 you have to choose for background eraser tool instead of the magic eraser tool.
TRIM AND SAVE
Trim all the unnecessary and unwanted parts. This will help you to get rid of the white backdrop parts around the clipped image.
Then save your file as PNG, not JPEG. If you save as JPEG, all your hard work will go in vain, as this keeps the image with the white background but PNG saves it with transparency.
Still unclear? Let’s clarify with screenshots!
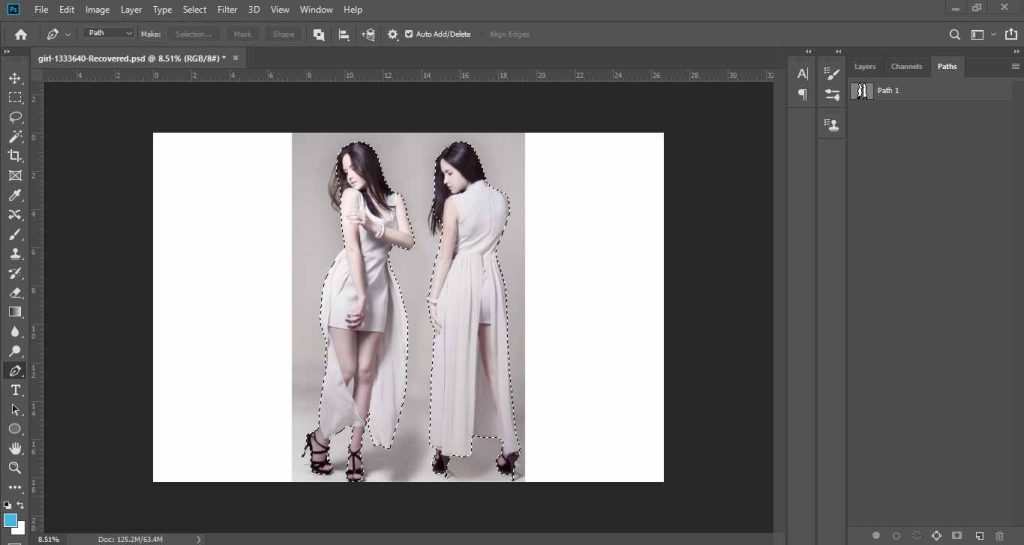
STEP ONE
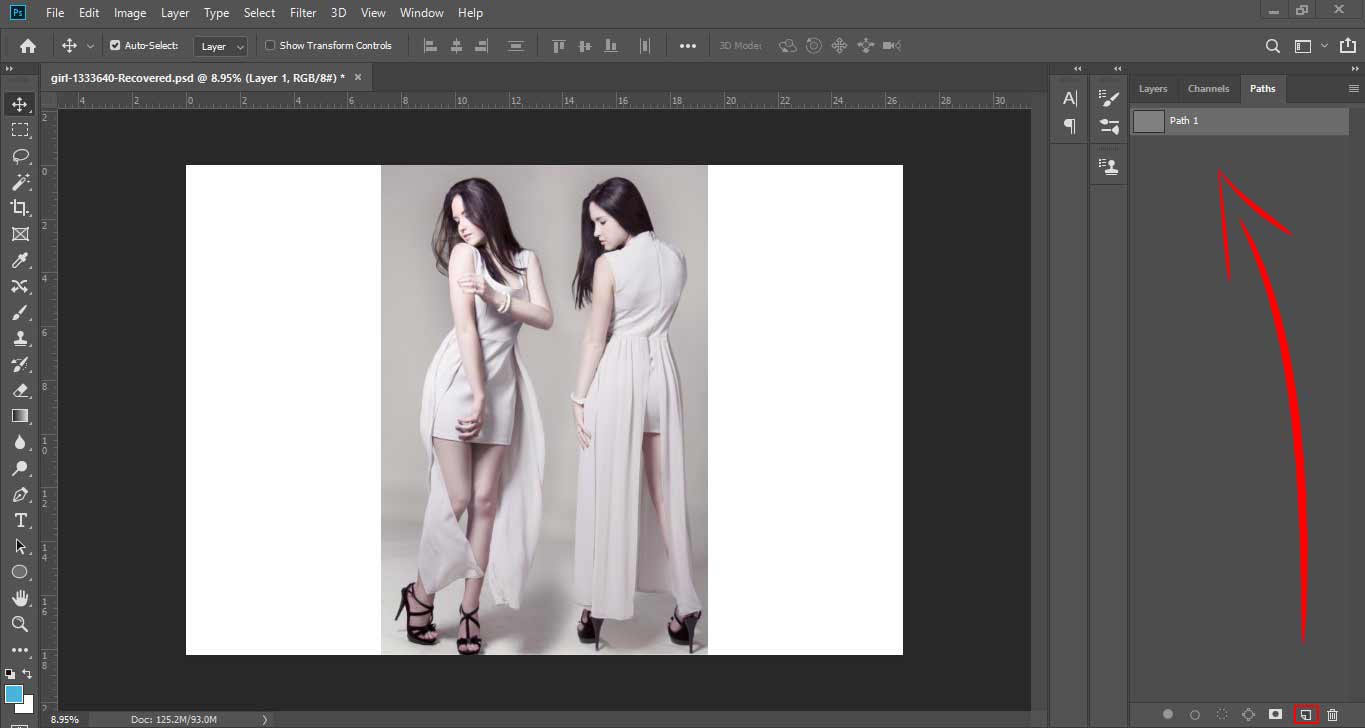
Open the image and create a new path.
STEP TWO
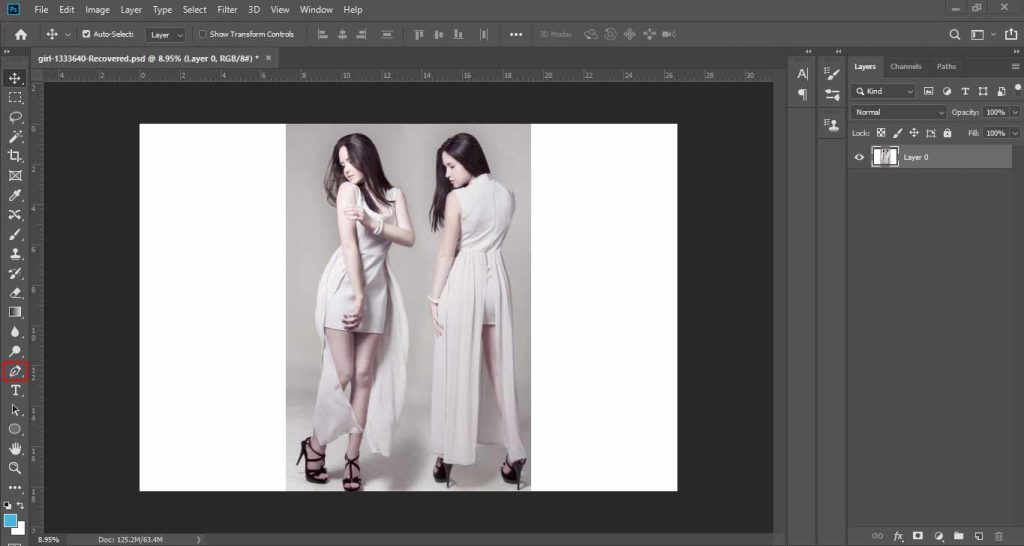
Select the pen tool in the left box below.
STEP THREE

Start clipping path with the tool.
STEP FOUR
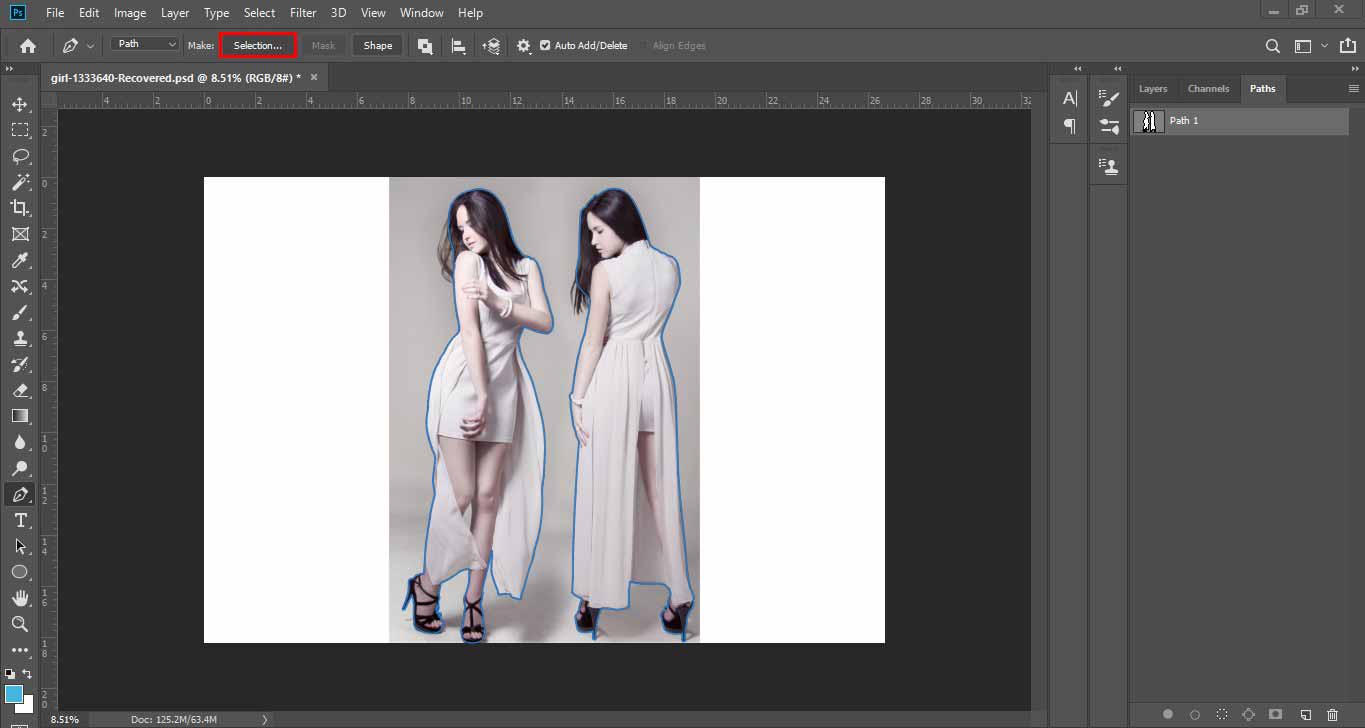
Click to make selection tool to point out the area.
STEP FIVE
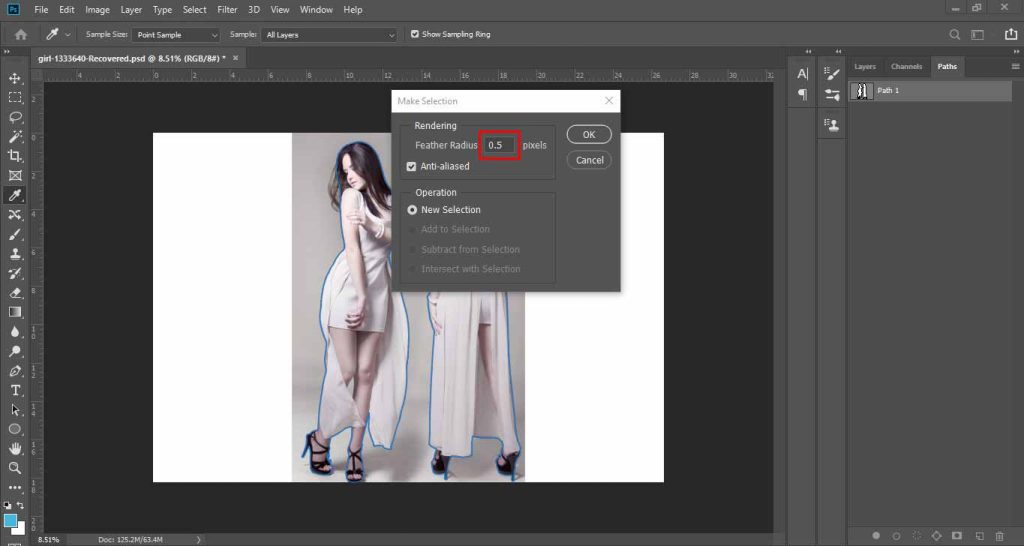
Select feature radius to 0.5.
STEP SIX
Once again, make the selection.
STEP SEVEN
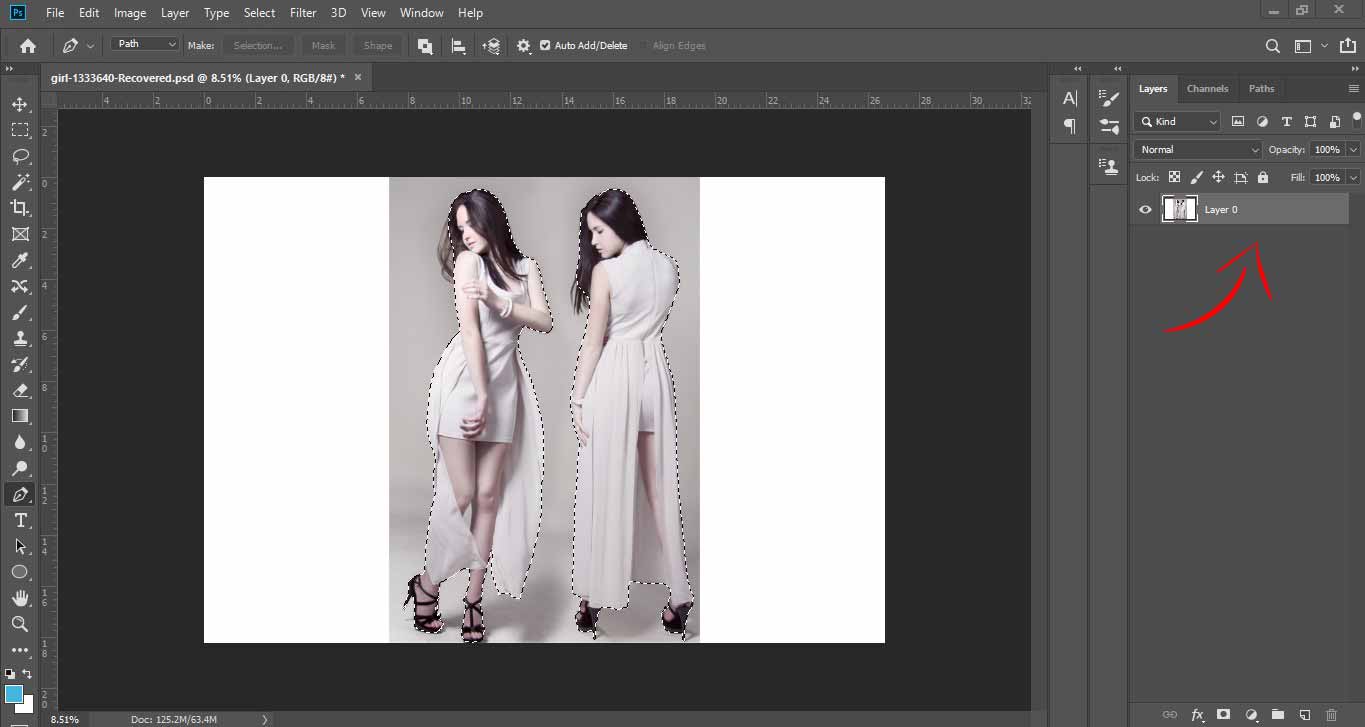
Select the original image layer in the right arrow.
STEP EIGHT
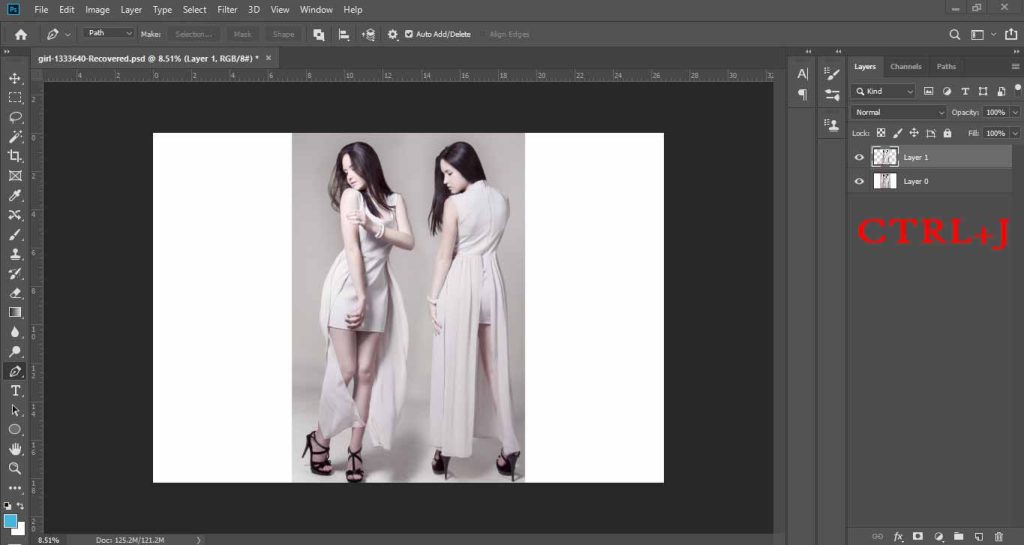
Type CTRL+J
STEP NINE
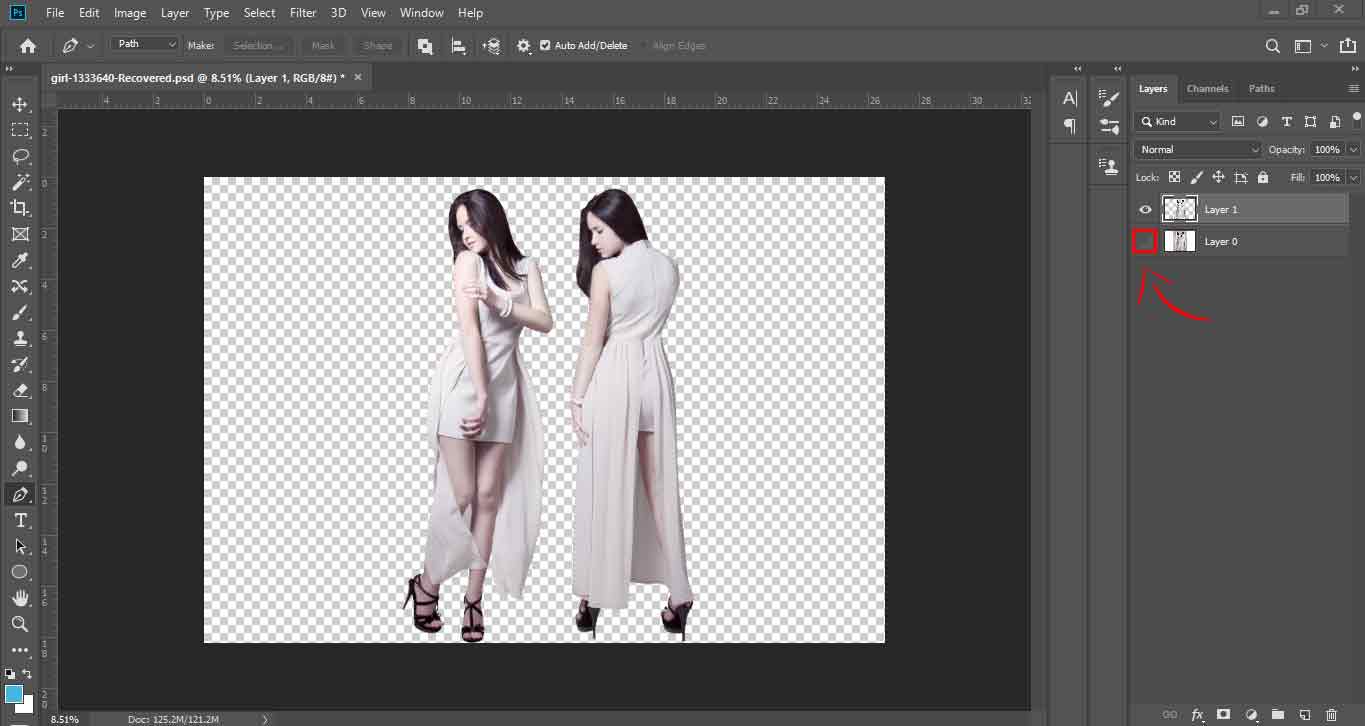
Now, make sure the original image layer eye off like the red box.
Conclusion
As we all know, now the importance of the removal of white background from photos in Photoshop. The removal of white background plays a vital role in changing the appearance of the images. In some cases, this feature is extremely crucial to get the exact picture that you want. So, with Photoshop now, it is really easy to change any background from any image within just a few minutes. Will you try it out yourself or by someone professional? Take a free consultancy from Image Retouching Lab via comment section or email.
