
In Photoshop using selection tools like- the pen tool or lasso tool you carefully target the visible parts of a mannequin to remove it.
This process of editing keeps the apparel only with natural curves and looks when worn. That way, you get an invisible mannequin.
However, the task many times doesn’t end in selecting and removing an unwanted figure.
So, we show you properly how to remove the mannequin from the photo. You will find techniques and tools for both beginner and advanced users.
Furthermore, you will get expert tips and tricks including image retouching, common issues, and solutions to them. Also, get a list of keyboard shortcuts at the end.
Why Ghost Mannequin Editing Matters: Reasons and Best Practices
When it comes to showcasing apparel in online stores, the removal of ghost mannequins plays a pivotal role in enhancing the presentation of clothing items.
Here’s why it’s crucial and how to master the process effectively:
Importance of Removing Mannequins in Photoshop: 4 Key Reasons
Removing mannequins from product photos is crucial for several reasons:
- Enhances Focus on Clothing: Mannequins can distract viewers from the actual clothing items. By removing them, the focus shifts entirely to the apparel, allowing potential customers to see the garments clearly.
Mannequins can distract viewers from the actual clothing items. By removing them, the focus shifts entirely to the apparel, allowing potential customers to see the garments clearly. Enhance this focus with our professional image masking services.| - Improves Visual Appeal: Pictures without mannequins tend to look cleaner and more aesthetically pleasing. The absence of distracting elements results in visually appealing images that can attract more attention from customers.
- Increases Versatility: Ghost mannequin photos can be used across various platforms and marketing channels. Whether it’s for e-commerce websites, social media ads, or print catalogs, these images offer versatility and flexibility in marketing strategies.
- Enhances Brand Image: Presenting clothing items without mannequins demonstrates attention to detail and professionalism. Brands that showcase their products in a polished manner are perceived as trustworthy and credible by customers.
Best Practices for Ghost Mannequin Editing:
To achieve professional results when removing mannequins from photos, follow these best practices:
- Maintain Realism: Ensure that the edited images retain a natural and realistic appearance. Pay attention to details such as wrinkles, folds, and shadows to preserve the authenticity of the clothing items.
- Utilize Layer Masking: Use layer masking techniques to seamlessly blend different elements of the image. Layer masking allows for precise editing without permanently altering the original image.
- Experiment with Tools: Explore a variety of editing tools in Photoshop, such as the Clone Stamp Tool, Healing Brush Tool, and Liquify Tool. Different tools are suitable for specific editing tasks, so experiment to find the most effective approach for each image.
- Ensure Consistency: Maintain consistency across all edited images to create a cohesive and professional-looking product catalog. Use the same editing techniques and standards to ensure uniformity in image quality.
- Pay Attention to Details: Zoom in while editing to focus on intricate details and ensure accuracy. Attention to detail is essential for creating high-quality ghost mannequin images that showcase the clothing items effectively.
By implementing these best practices, you can effectively remove mannequins from product photos and create compelling ghost mannequin images that enhance the visual appeal of your products and elevate your brand image.
Using Pen Tool for Ghost Mannequin Removal: 4 Easy Steps
Pen Tool in Photoshop allows you to make a precise selection. Let’s walk you through the steps:
Step 1: Enable Path Editing & Select Pen Tool
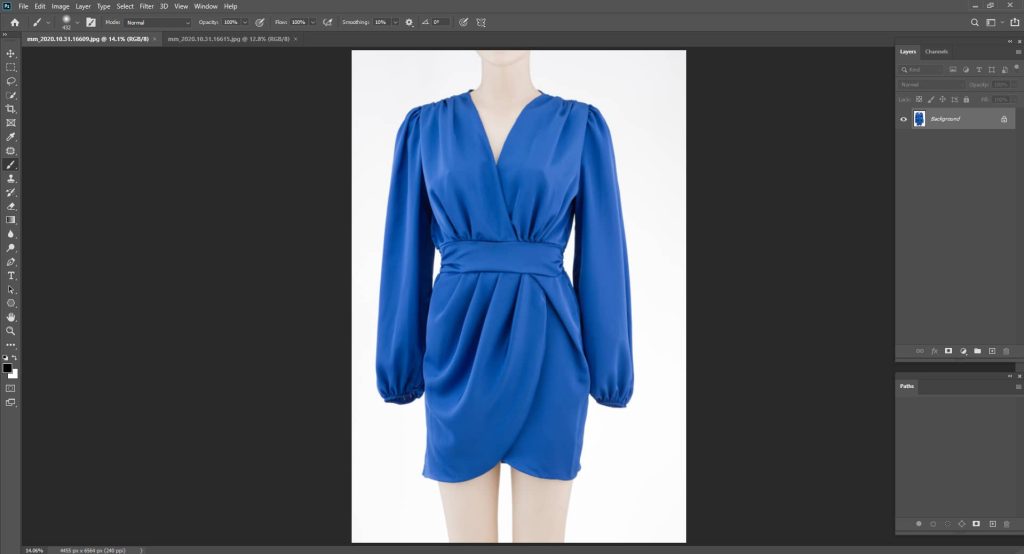
Drag and drop an image in Photoshop.
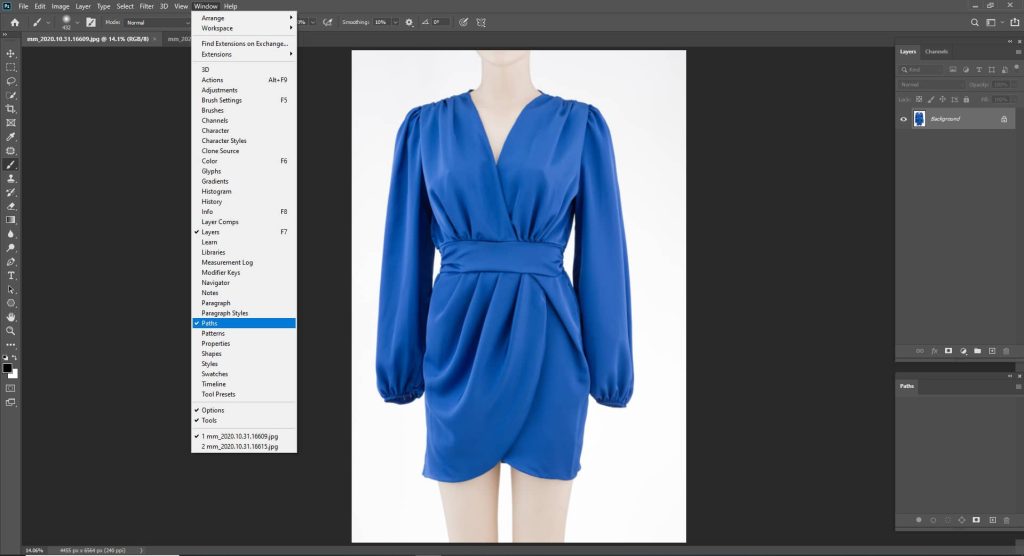
Enable the feature of editing via creating paths: Windows > Paths
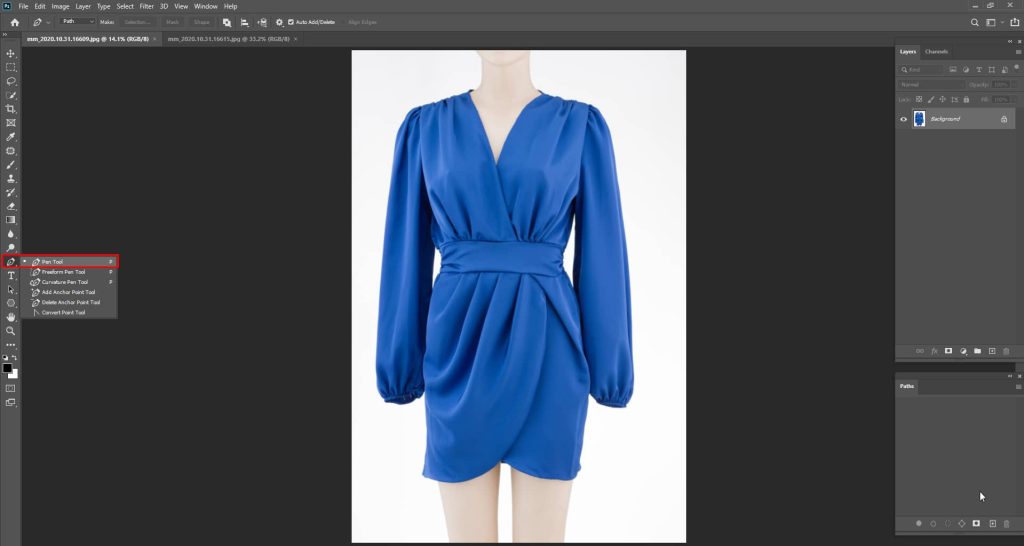
Get the Pen Tool by pressing “P” on your keyboard. Or you can select it as shown below.
Step 2: Create a Path & Adjust the Curves
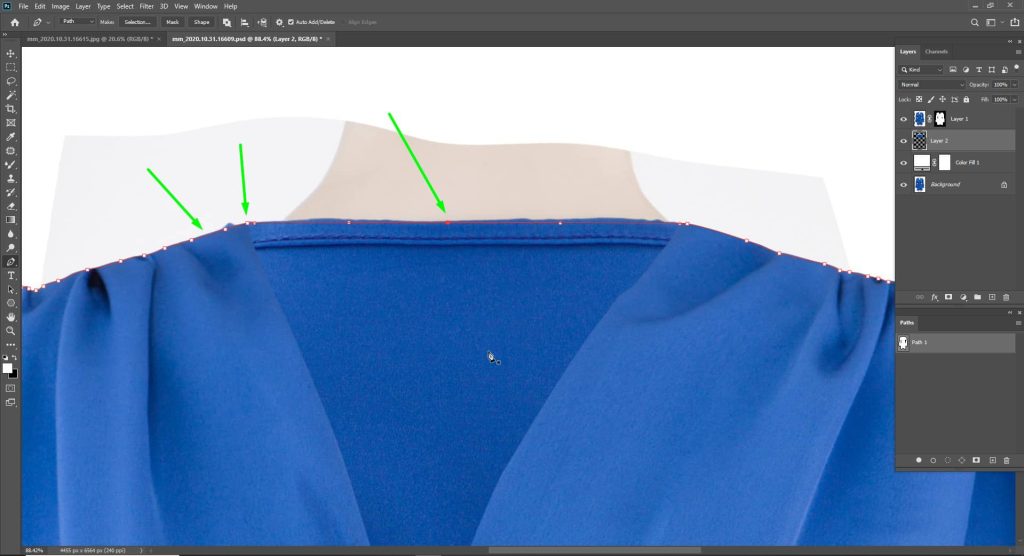
Click to place anchor points around the mannequin’s outline/ edge – focus on its contours closely. Use as many anchor points as needed for smooth curves and accurate selections.
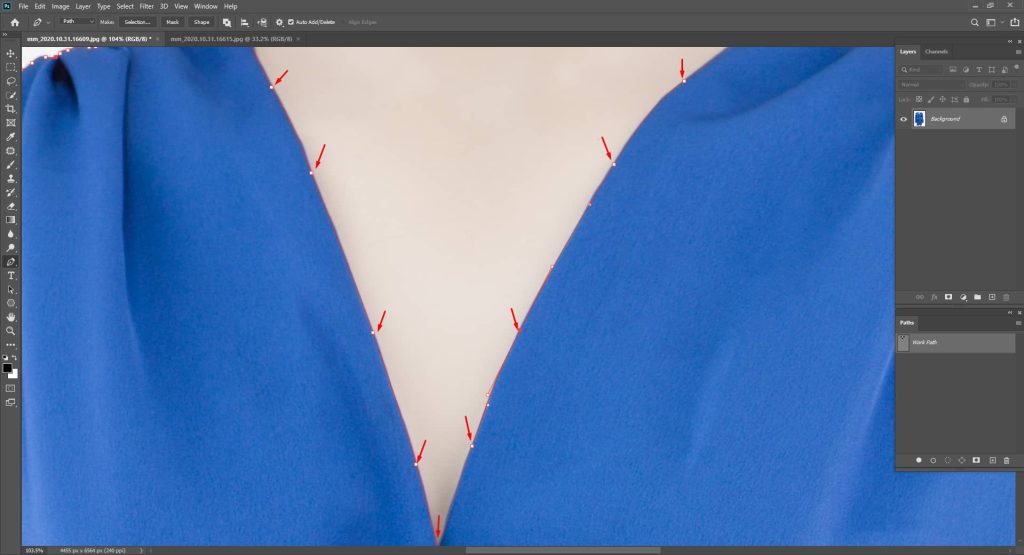
To create curved segments, click and drag the anchor points to manipulate the Direction Handles as pointed out below. Hold down the “Option” key (Mac) or “Alt” key (Windows) to adjust only one side of the curve independently.

Step 3: Close the Path
Once you have outlined the entire mannequin with the pen tool, connect the last anchor point to the first one by clicking on it. This action closes the path and creates a complete selection.
If you close the point adding the starting and ending the anchor points will turn blue.
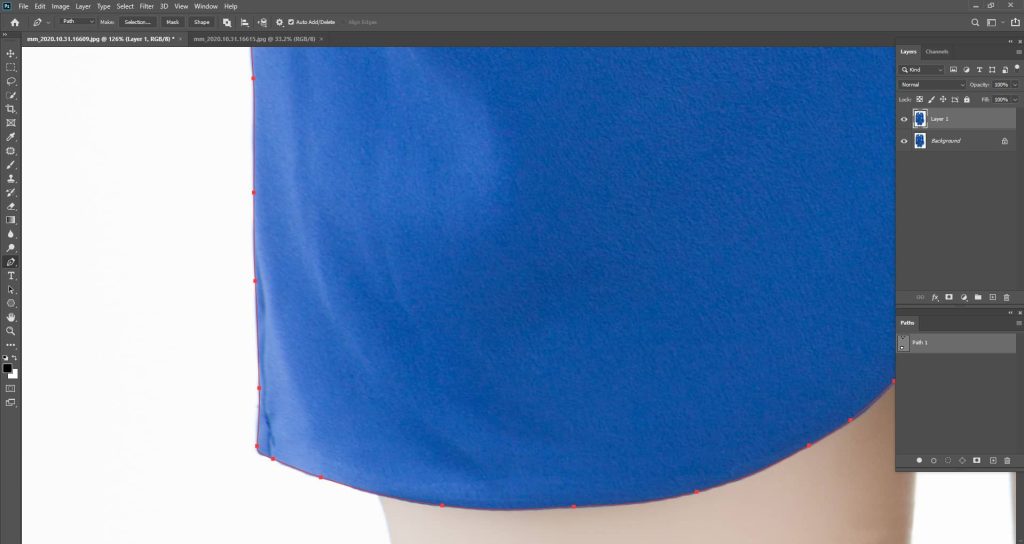
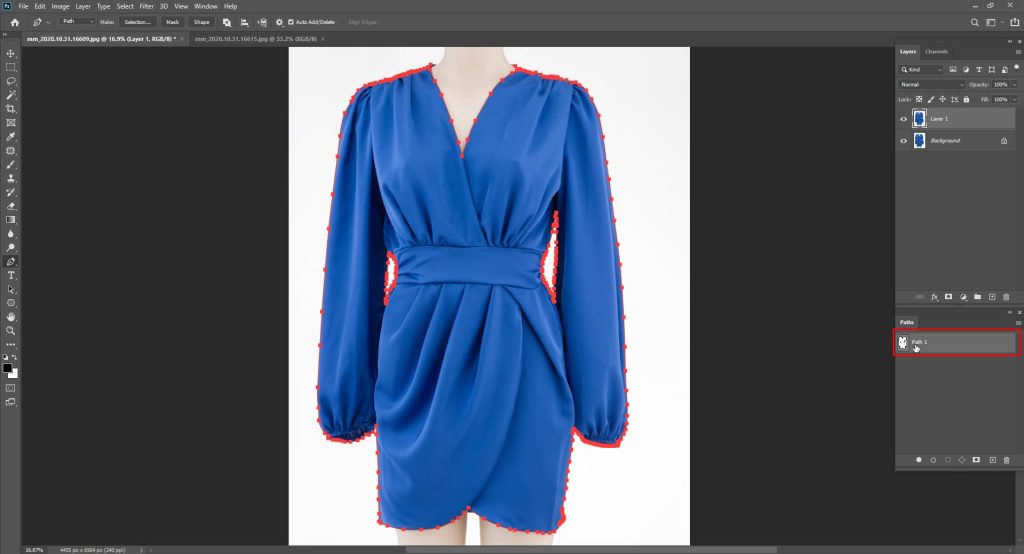
The final result will look something like this:

Step 4: Remove the Mannequin with Refined Edge
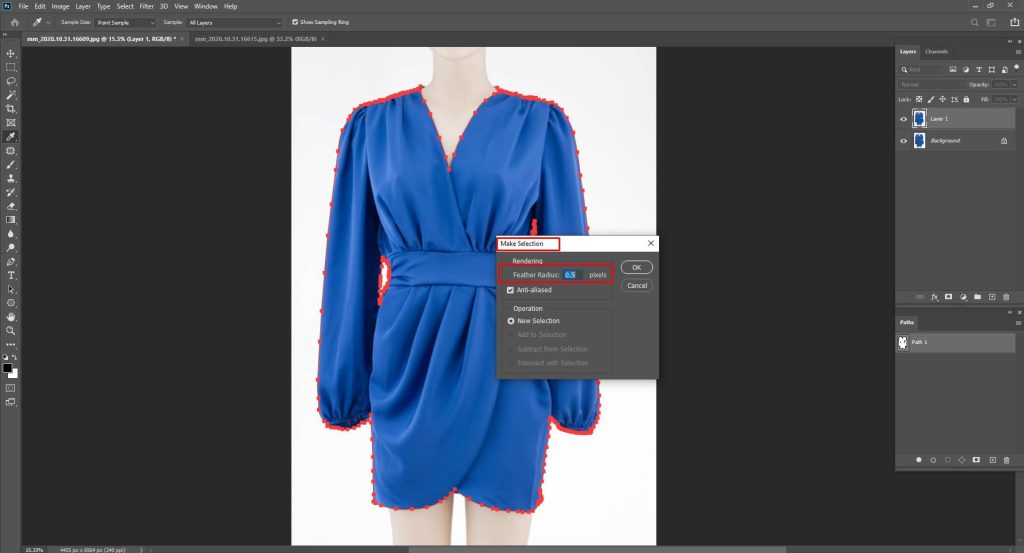
Before you get rid of the mannequin, you need to set one more option Feather Radius to have a smooth edge. To do that, after closing the path right click on the path as shown in the image below.
- Or use the shortcuts
Shift + 6 (Windows/Mac)
Then a list of options will appear. Click on Make Selection.
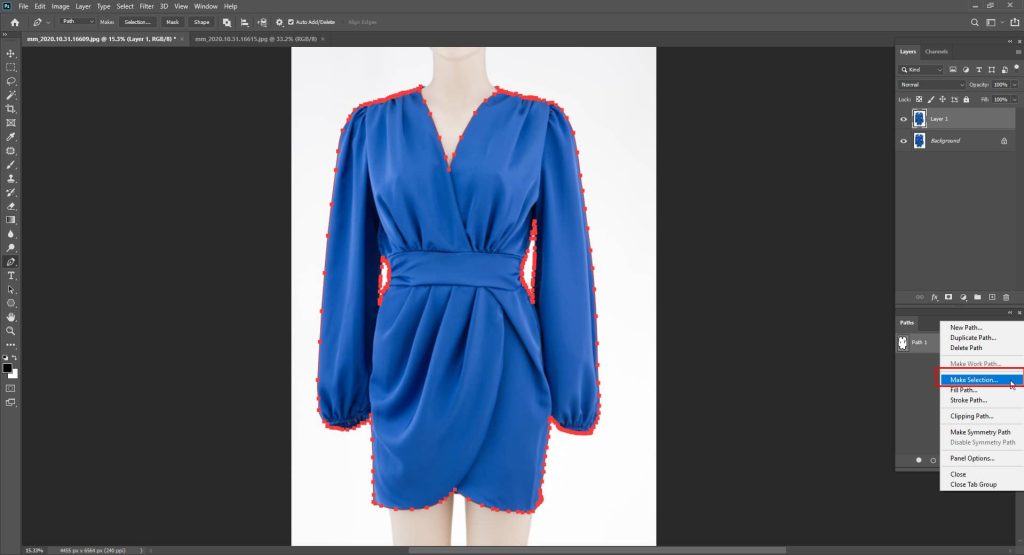
A small window will pop up. Adjust Feature Redius accordingly and press OK.
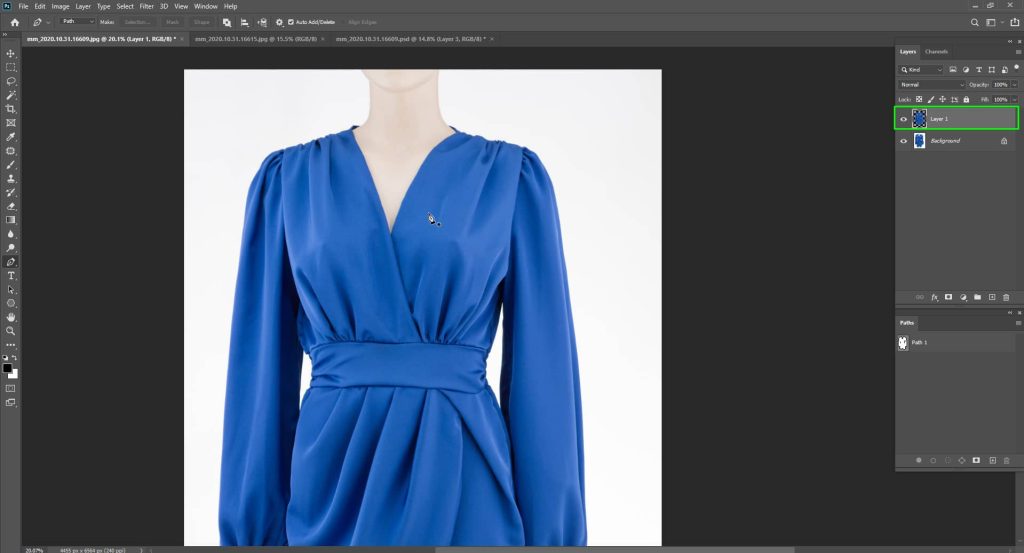
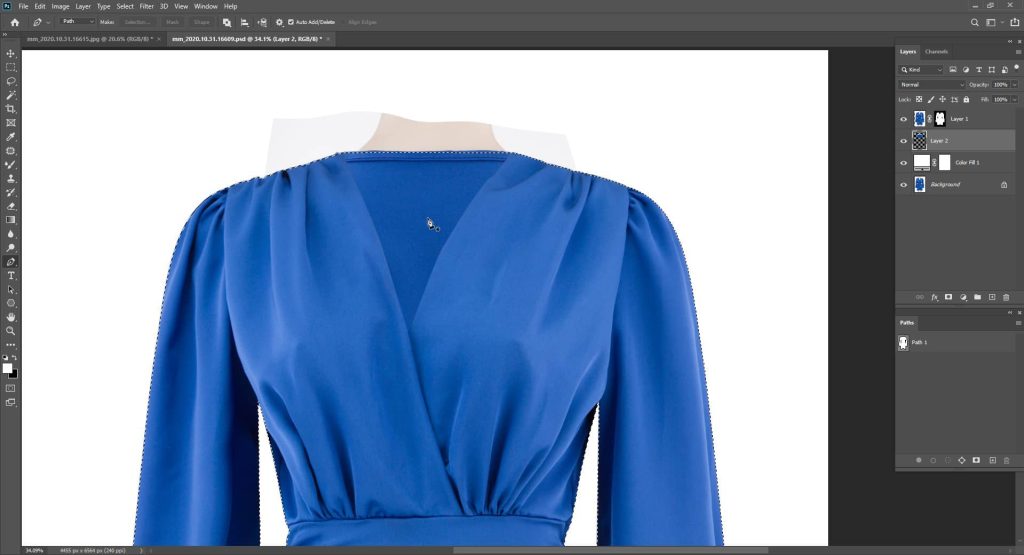
Now, you need to separate the selection. Do that with the shortcut Ctrl + J (Windows) / Cmd + J. By this, you create a layer of the apparel only.
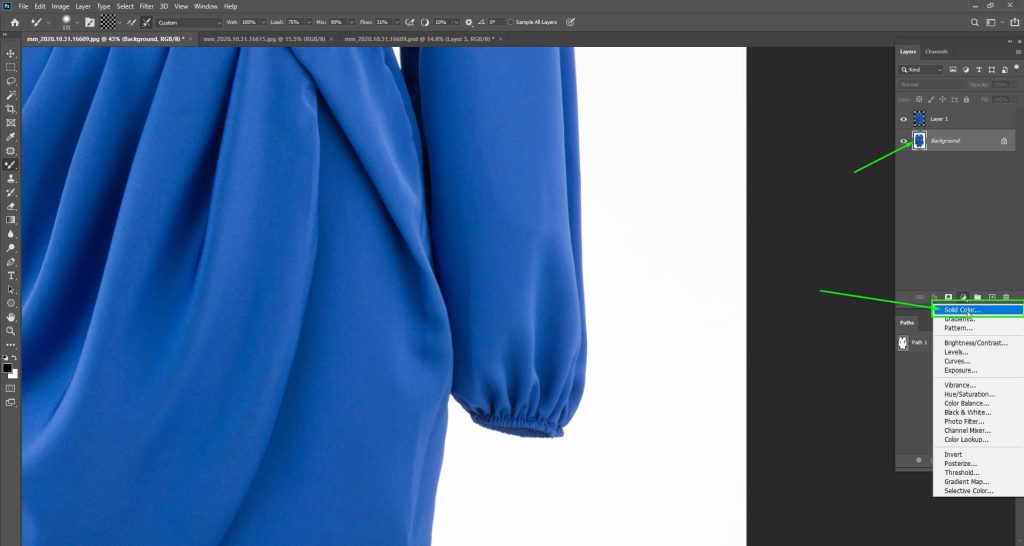
Select a Solid Color to have the apparel on a new background.
After clicking on Solid Color, you will see a small Color Picker window. Drag the pointer to the complete white and hit OK.
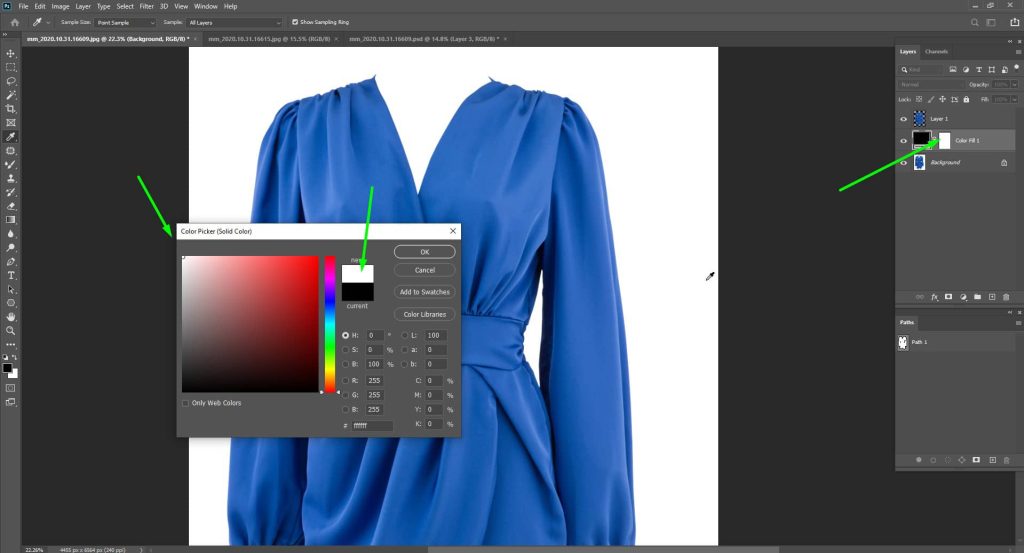
Next, you will see that the higher back side is removed as well! Just like this:
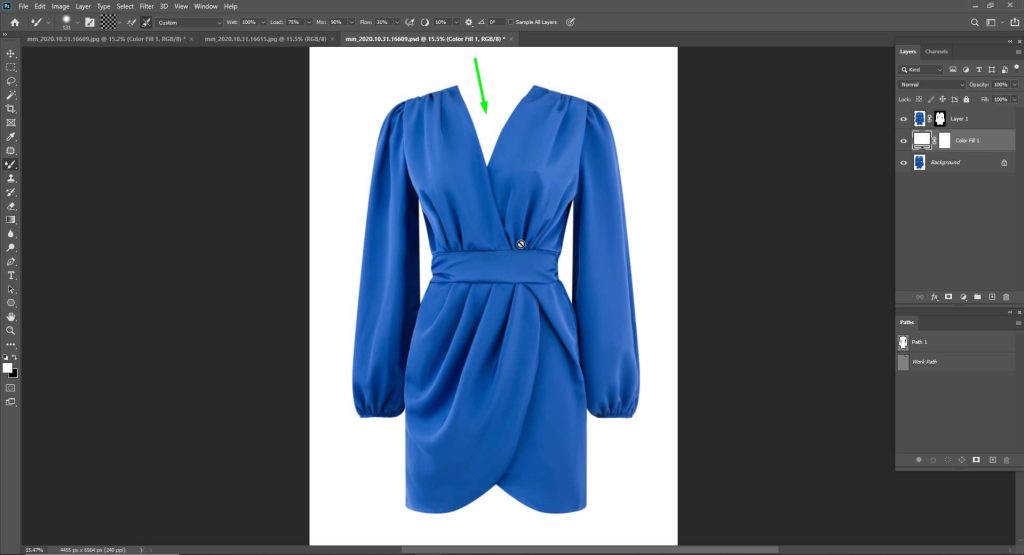
Your task would have been done, if the apparel had equal back and front. Now, we will show you how to add the back side in the next part of our guide.
How to Create a Neck-Joint Effect in Photoshop: 4 Steps
Is there a Neck Joint task in the picture? Maybe something like this:
Photographers take lots of pictures of a piece of clothing being worn by either a mannequin or a person from different angles – front, back, and inside.
Then, in the editing process, you remove the mannequin or person from the pictures.
But, here is the problem, the edits must blend the front and back views of the clothing around the neck area.
Additionally, many clothes come with a higher backline and lower neckline.
Here is how to work in the neck area:
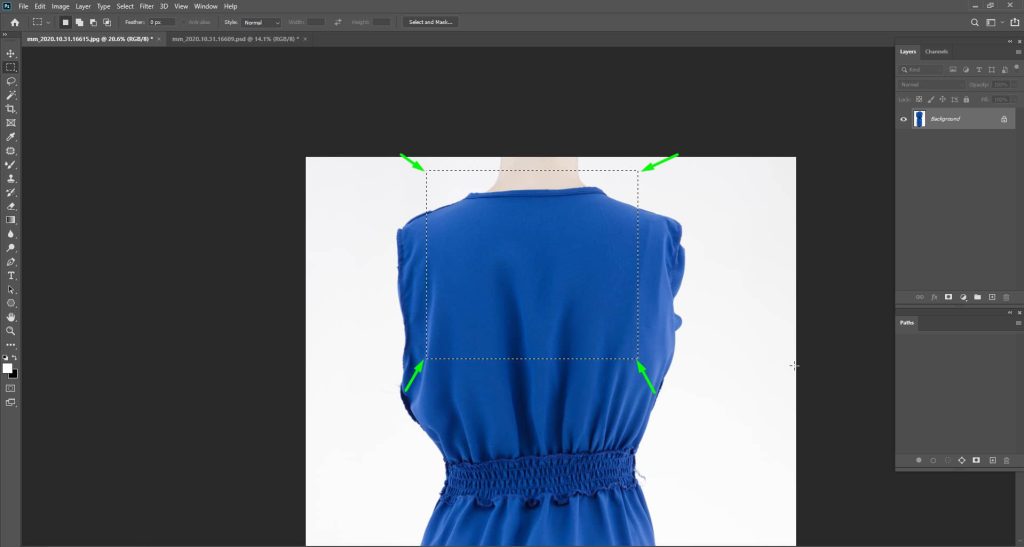
Step 1: Open a Fresh Image of the Back Side of the Neck
To include a back side of the clothing, you need an image with a clearly visible back of the cloth. Like this:

Step 2: Select, Copy & Paste the Neck Area
- Shortcuts
Select: Ctrl + Tab (Windows) / Cmd + Tab (Mac)
Copy: Ctrl + C (Windows) / Cmd +C
Select the neck area with Ctrl + Tab (Windows) / Cmd + Tab (Mac) and copy it with Ctrl + C (Windows) / Cmd +C.
Now, go the the main file and paste the selection using these shortcuts.
- Shortcuts
Ctrl + V(Windows)
Command + V (mac)
Step 4: Adjust the Neck Part
- Shortcuts
Ctrl + T (Windows) / Cmd T (Mac)
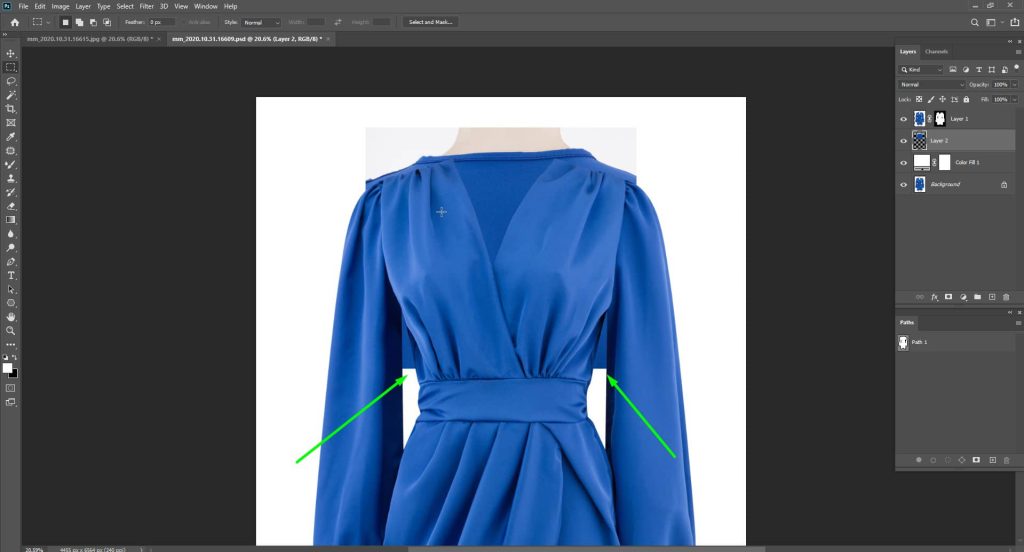
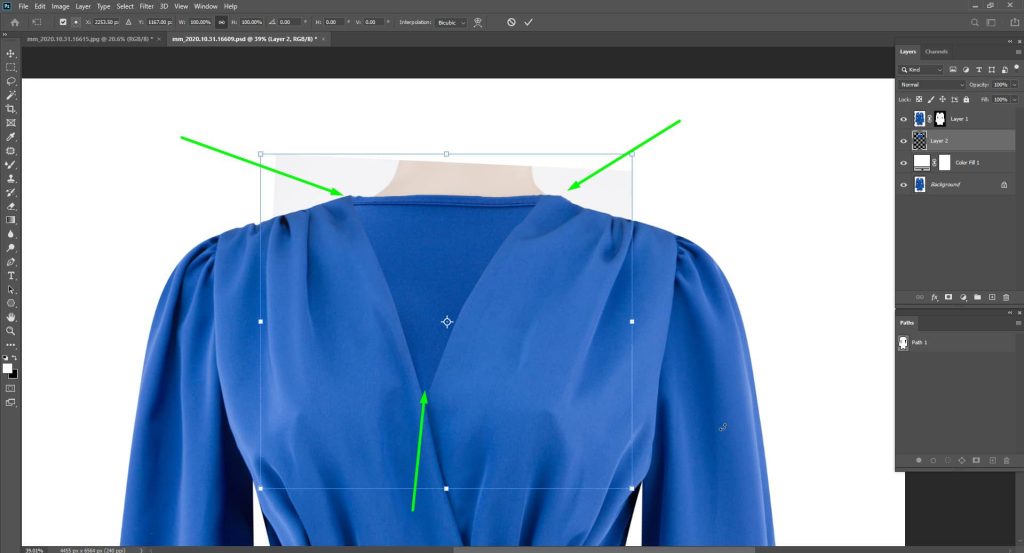
Using the shortcuts select, move, and resize the neck part to adjust it with the main image.
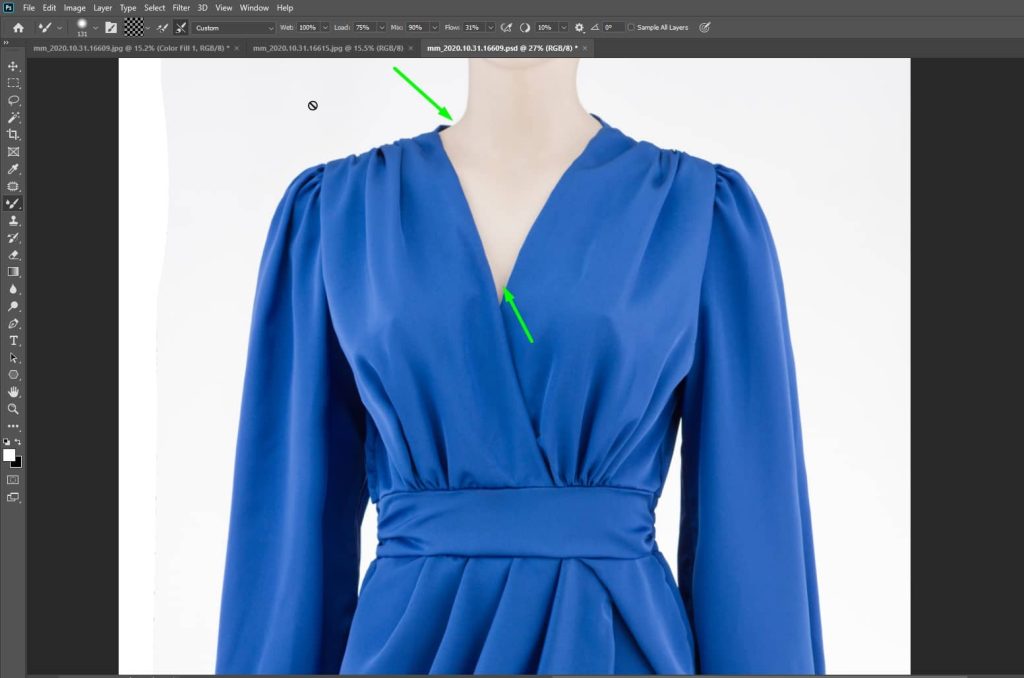
The adjustment won’t look natural right now. So, there are a few edits to do.
Make sure the Back Tag of the cloth is right in the middle. Also, the neck should be a little bit outside the main neckline, as shown below:
Click on the right button and select Warp from the menu.
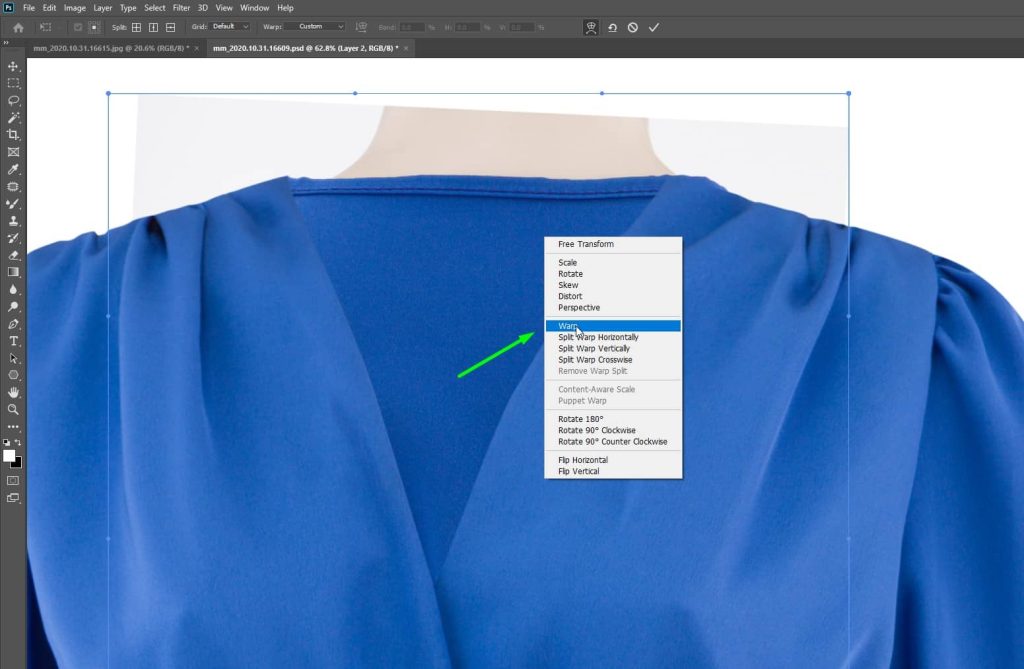
After selecting Wrap the new neck-joint part will appear in a box like this:
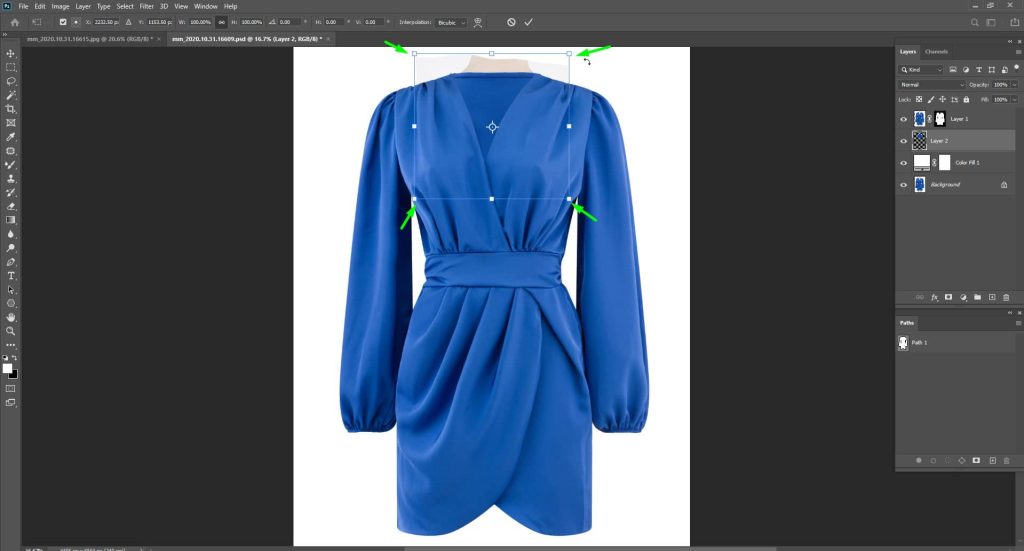
Press Alt (Windows) / Option (Mac) click and drag the pointed areas below to adjust the back side of the neck further.
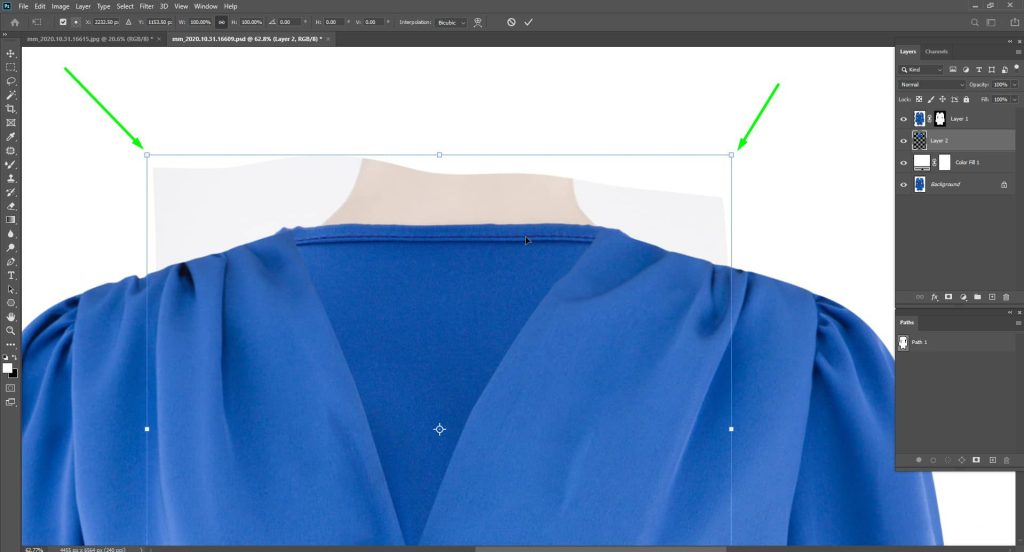
The result can be something like this:

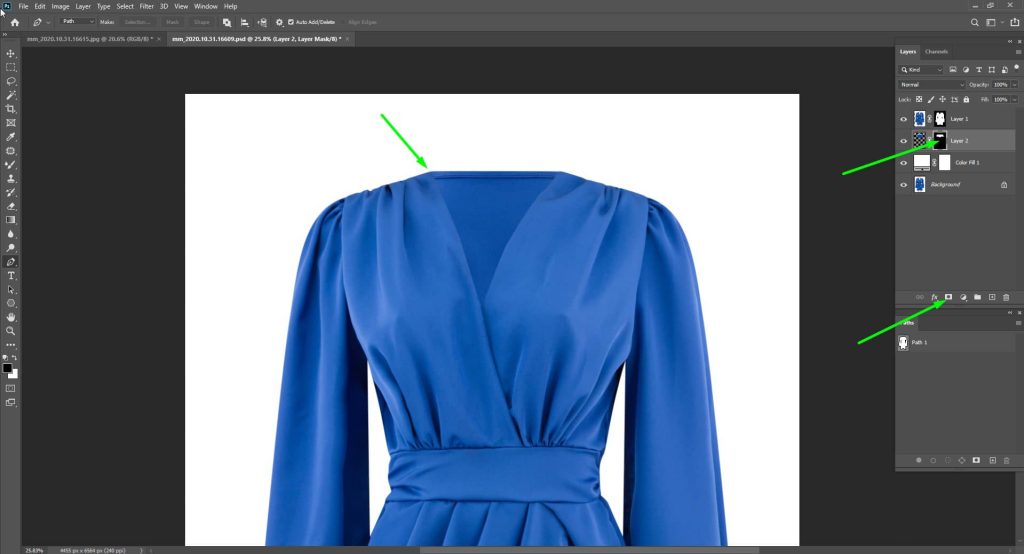
Create another path around the neckline covering both the back and front.
Next, select the path by pressing Control (Windows) / Command (Mac).
And, merge as indicated on the right side of the picture. You will also, see a complete outline in a layer on the right side. In the middle of the window, you have the final look.
Check this Video Tutorial BUT hold on- want to learn the BEST PRACTICES? Check the section after the video.
ARE YOU HAVING TROUBLE WITH TRICKY APPAREL? MUST CHECK THE NEXT SECTION FOR TIPS.
Tips for Handling Tricky Garments & Materials in Photoshop
With the following suggestions, you can handle even the trickiest fabrics and materials in your photos, making them look natural and polished.
Just remember to take your time and experiment until you get it just right.
Transparent Fabrics
Taking out mannequins from pictures with see-through fabrics like chiffon or lace can be challenging. But if you do it keeping these tips in mind, you are going to do just fine.
Pick and Choose
First, use tools like the Pen Tool or Lasso Tool to select only the parts of the fabric that cover the mannequin.
This way, you are only editing what you need to, leaving the rest of the picture untouched.
Keep it Natural
See-through fabrics have wrinkles and shadows that make them look real. Try to keep these details when you are editing.
You can adjust how see-through the fabric looks to match the rest of the photo.
Reflective Surfaces
When you are dealing with shiny materials that reflect light, like glossy jackets or patented leather shoes- it’s a bit different. So, here are some tips to handle reflections.
Reduce Reflections
Before you take the picture, try to set up the lighting so there aren’t too many reflections. But if you can’t avoid them, don’t worry—you can fix them later during your image post-production.
Choose Your Tools
Use selection tools to pick out the shiny parts and then explore the settings to make them look less reflective.
You can also try using special tools in your editing software to clone over the glossy bits or adjust the colors and brightness to match the rest of the item.
FIND EVEN MORE TIPS IN THE FOLLOWING SECTION.
Common Challenges & Solutions in Mannequin Removal
While erasing the figure you are likely to face some issues. But that doesn’t mean it’s the end of your ghost mannequin mastery. We have listed down some common challenges with the solutions.
Time to overcome obstacles in mannequin removal and achieve professional-looking results in your edited photos.
Mismatched Colors & Textures
After removing a mannequin from a photo, sometimes the colors or textures in that area don’t quite match the picture. To fix it-
Adjustment Layers & Blending Modes
Use tools in your editing software to modify the colors and tones where the mannequin is.
This helps blend everything together nicely. You can also try different blending modes for a seamless appearance.
Complex Poses & Angles
Photos with tricky poses or angles can be tough to edit, but there are ways to handle them-
Try a Variety of Tools
Experiment with different tools in your editing software. Some tools are better for certain poses or angles than others.
For example, the Clone Stamp or Healing Brush tool can help fix rough edges or fill in missing parts.
Take Your Time
Always keep in mind – DO NOT RUSH. Editing tricky photos takes patience. Try different approaches until you find the one that works best for each photo.
It might take some trial and error, but it’s worth it for a great result.
Advanced Photoshop Techniques for Removing Mannequins
You can make sure of the isolation techniques based on your needs. Anyway, let’s look at some other ways.
Basic Clone Stamp Tool for Mannequin Photoshop
1. Select Clone Stamp Tool: Press S to select the Clone Stamp Tool.
- Windows Shortcut: Alt + S
- Mac Shortcut: Option + S
2. Adjust Clone Stamp Settings: Adjust the brush size and hardness as needed using the bracket keys [ and ], or right-click on the canvas for more options.
3. Clone Over Mannequin: Hold Alt (Windows) or Option (Mac) and click on an area near the mannequin that you want to clone. Release Alt/Option, then click and paint over the mannequin to cover it up.
4. Fine-tune: Use the Clone Stamp Tool to blend the cloned areas with the background seamlessly.
Content-Aware Fill for Ghost Mannequin in Photoshop
1. Select Area Around Mannequin: Use the Lasso Tool (L) or Quick Selection Tool (W) to select the areas around a mannequin.
- Windows Shortcut: L or W
- Mac Shortcut: L or W
2. Content-Aware Fill: Go to Edit > Content-Aware Fill.
- Windows Shortcut: Alt + E, then U
- Mac Shortcut: Option + E, then U
3. Fine-Tune: After Photoshop fills the selected area, use the Clone Stamp Tool or Healing Brush Tool (J) to fine-tune any areas that need adjustment.
- Windows Shortcut: J
- Mac Shortcut: J
Layer Mask and Patch Tool for Mannequin Photography
1. Duplicate Layer: Right-click on the layer in the Layers panel and select “Duplicate Layer.”
2. Select Patch Tool: Press J to select the Patch Tool.
- Windows Shortcut: J
- Mac Shortcut: J
3. Patch Around Mannequin: Use the Patch Tool to select the areas around the mannequin that you want to remove.
4. Create Layer Mask: Click on the duplicated layer and click the “Add Layer Mask” button at the bottom of the Layers panel. This will create a layer mask based on your selection.
5. Hide Selected Areas: With the layer mask selected, paint over the areas you want to hide using a black brush.
6. Blend Edges: Use the Clone Stamp Tool or Healing Brush Tool to blend the edges of the masked areas with the background.
Essential Keyboard Shortcuts for Ghost Mannequin Photo Editing
Using keyboard shortcuts can make your work in Photoshop smoother and faster.
These shortcuts are just some of the commonly used ones, but there are many more available for different tools and functions.
You can even customize them to fit your own preferences by going to the Keyboard Shortcuts menu under Edit (Edit > Keyboard Shortcuts).
| Action | Shortcut |
|---|---|
| Duplicate Layer | Ctrl + J (Windows) / Cmd + J (Mac) |
| Merge Visible Layers | Ctrl + Shift + Alt + E (Windows) / Cmd + Shift + Option + E (Mac) |
| Select All | Ctrl + A (Windows) / Cmd + A (Mac) |
| Deselect | Ctrl + D (Windows) / Cmd + D (Mac) |
| Transform (Free Transform) | Ctrl + T (Windows) / Cmd + T (Mac) |
| Rotate 90° Clockwise | Ctrl + ] (Windows) / Cmd + ] (Mac) |
| Rotate 90° Counter-clockwise | Ctrl + [ (Windows) / Cmd + [ (Mac) |
| Move Selection (in 1-pixel Increments) | Arrow keys |
| Move Selection (in 10-pixel Increments) | Shift + Arrow keys |
| Copy Selected Pixels | Ctrl + C (Windows) / Cmd + C (Mac) |
| Paste | Ctrl + V (Windows) / Cmd + V (Mac) |
| Undo | Ctrl + Z (Windows) / Cmd + Z (Mac) |
| Redo | Ctrl + Shift + Z (Windows) / Cmd + Shift + Z (Mac) |
| Zoom In | Ctrl + + (Windows) / Cmd + + (Mac) |
| Zoom Out | Ctrl + – (Windows) / Cmd + – (Mac) |
| Fit to Screen | Ctrl + 0 (Windows) / Cmd + 0 (Mac) |
| Hide/Show Guides | Ctrl + ; (Windows) / Cmd + ; (Mac) |
| Hide/Show Rulers | Ctrl + R (Windows) / Cmd + R (Mac) |
