
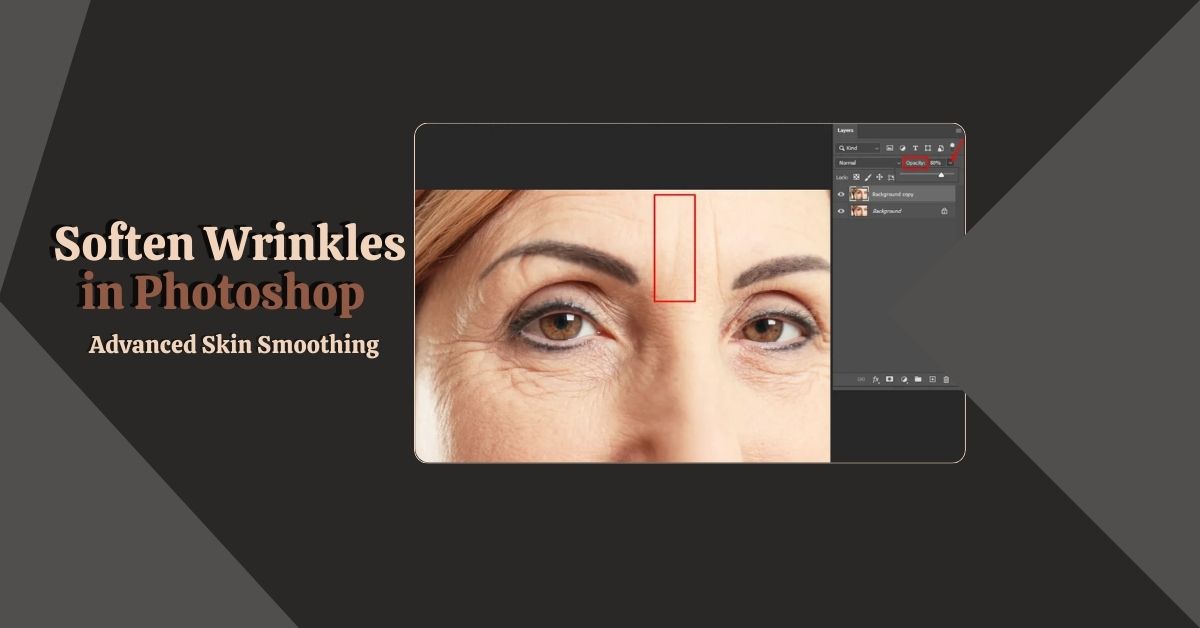
Instead of removing wrinkles completely, you can soften wrinkles in Photoshop via these steps:
- Make a “Background Copy”
- Select “Clone Stamp Tool”
- Go to “Brush Preset Picker”
- Open “General Brushes”
- Pick “Soft Round”
- Make the Brush Small to Keep It Natural
- Keep the “Foreground” – White
- Target a Wrinkle Line and Hold “Alter / Option” to Select a Better Skin Texture around It
- Left-click on the Wrinkle Line to Replace It with the Better Skin Texture Selected
- Gradually Cover Wrinkles in Small Portions by Selecting a Skin Texture and Apply on a Wrinkle
- Decrease the “Opacity” of the “Background Copy” to Keep It “Reduced” Not Necessarily Removed.
Check out the following instructions for more detailed steps.
Easy-to-Follow 11 Steps: Face Wrinkle Reduction in Photoshop
One of the easy techniques to reduce or smoothen fine lines in Photoshop is using the “Clone Stamp Tool” and “Opacity” in the “Layer Panel”.
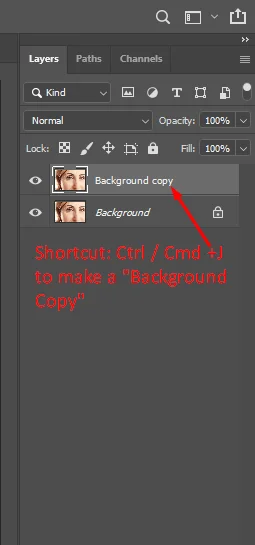
Step 1: Make a Background Copy
Before starting any edits, it’s essential to create a duplicate of your original image to work on, preserving the integrity of the original.
Open your image in the “Background” layer. Then, using “Ctrl / Cmd + J” create a “Background Copy”.
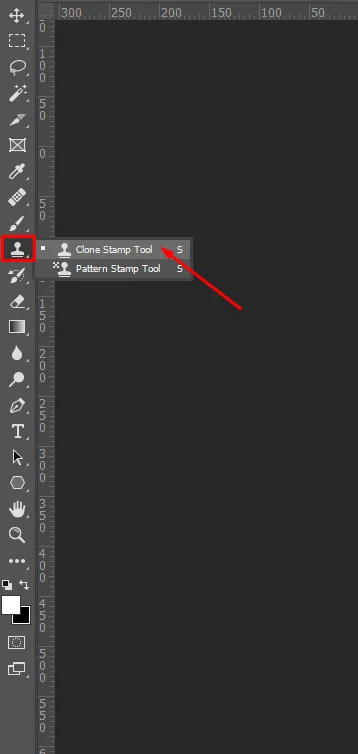
Step 2: Select Clone Stamp Tool
Select “Clone Stamp Tool” from the toolbar.
The Clone Stamp Tool is a versatile tool used for duplicating areas of an image. It allows you to sample pixels from one area and paint them onto another, effectively hiding imperfections such as wrinkles.
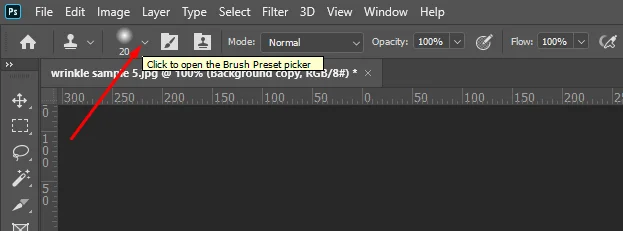
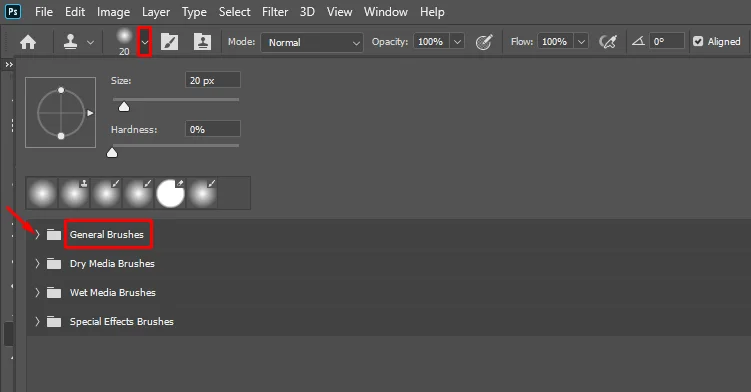
Step 3: Go to Brush Preset Picker
Open the “Brush Preset Picker” window.
The Brush Preset Picker is where you can choose different brush types and settings for the Clone Stamp Tool.
Step 4: Open General Brushes
Go to the folder “General Brushes”
Within the Brush Preset Picker, navigate to the “General Brushes” folder, where you’ll find a variety of brush options.
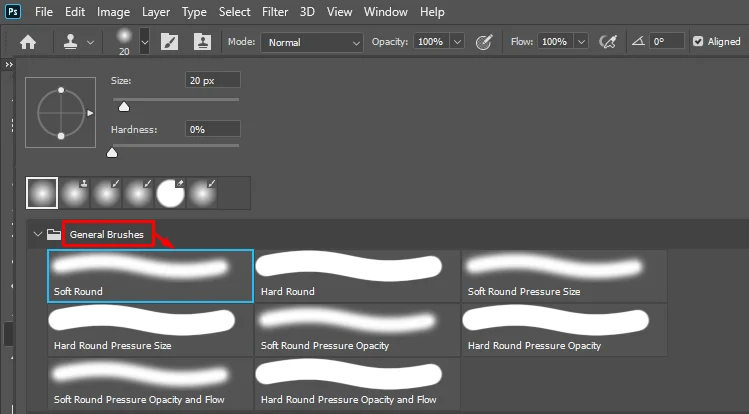
Step 5: Pick Soft Round
Choose “Soft Round” from “General Brushes”.
Selecting a soft round brush ensures smooth blending and natural-looking results when softening fine lines.
Step 6: Make the Brush Small to Keep It Natural
Keep the brush size small—just enough to cover a single wrinkle line.
Adjust the brush size to be just large enough to cover a single wrinkle line. This helps maintain a natural appearance by targeting specific areas.

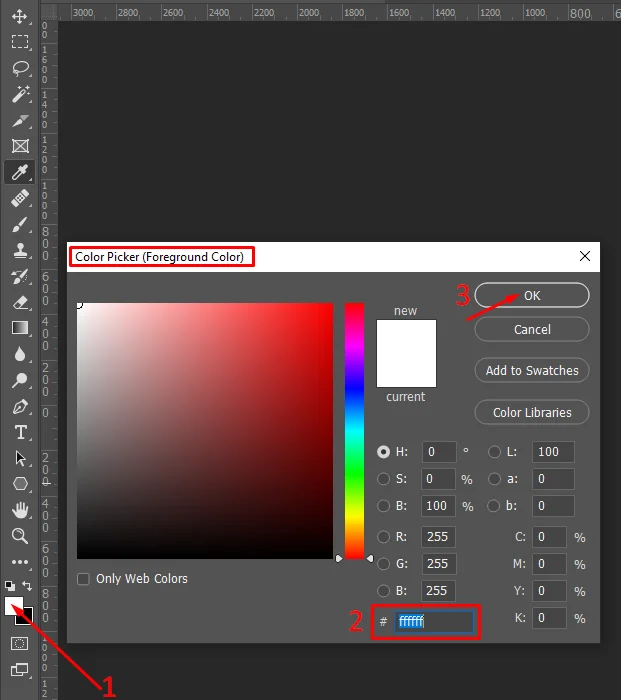
Step 7: Keep the “Foreground” – White
Set the “Foreground” white.
By keeping the foreground color white, you ensure that the sampled pixels blend seamlessly with the surrounding skin tones.
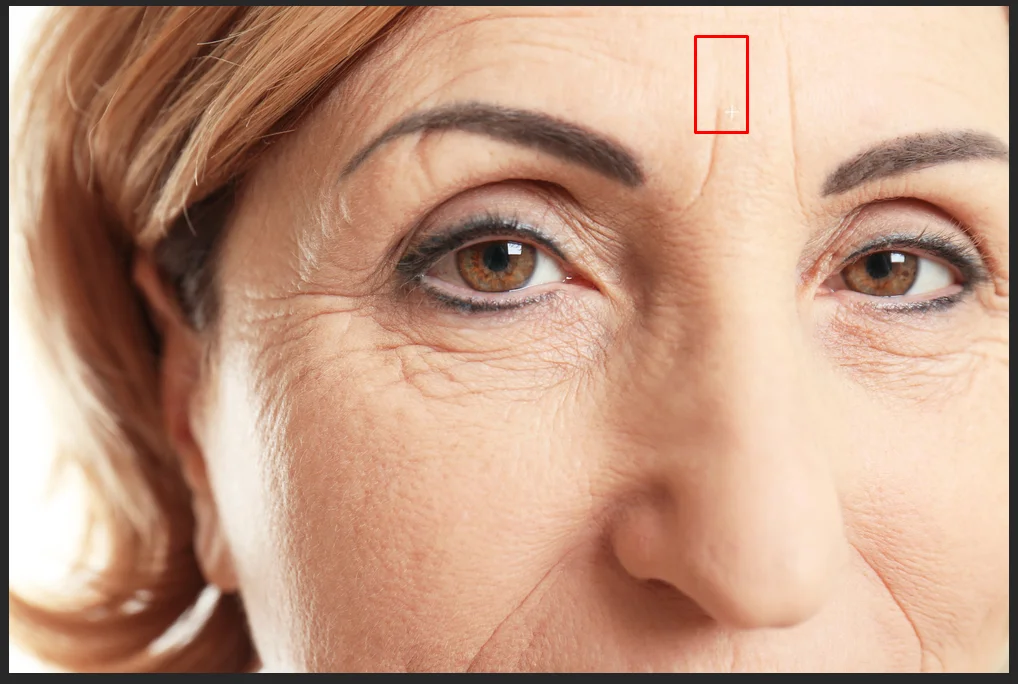
Step 8: Target a Wrinkle Line and Hold “Alter / Option”
Select a better skin texture using “Alter / Option”.
When using the Clone Stamp Tool, hold down the “Alt” (Windows) or “Option” (Mac) key to sample a nearby area with a better skin texture.
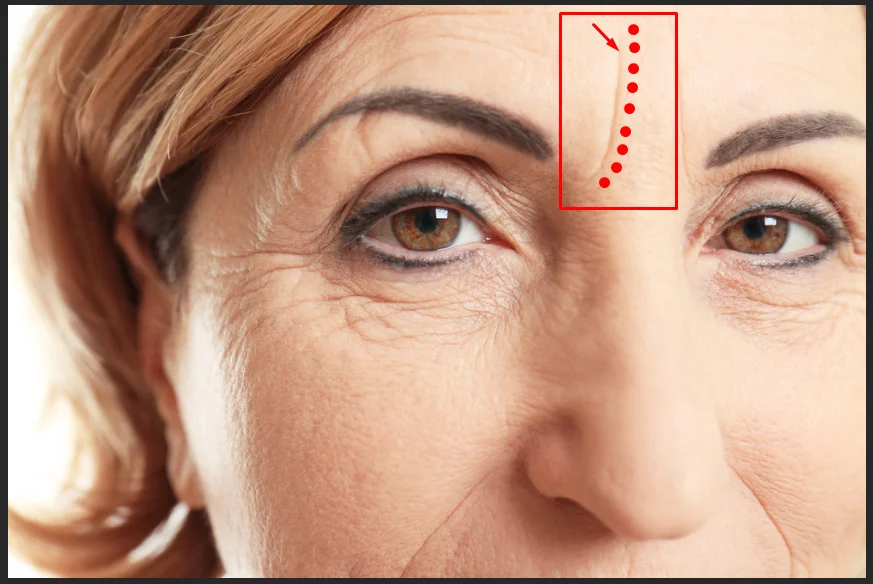
Step 9: Left-click on the Wrinkle Line
Select better skin texture with “Alter / Option”, at the same time—-start covering the wrinkle line with “Left-clicks”.
After sampling the desired skin texture, left-click on the wrinkle line to replace it with the sampled pixels, effectively softening the wrinkle.
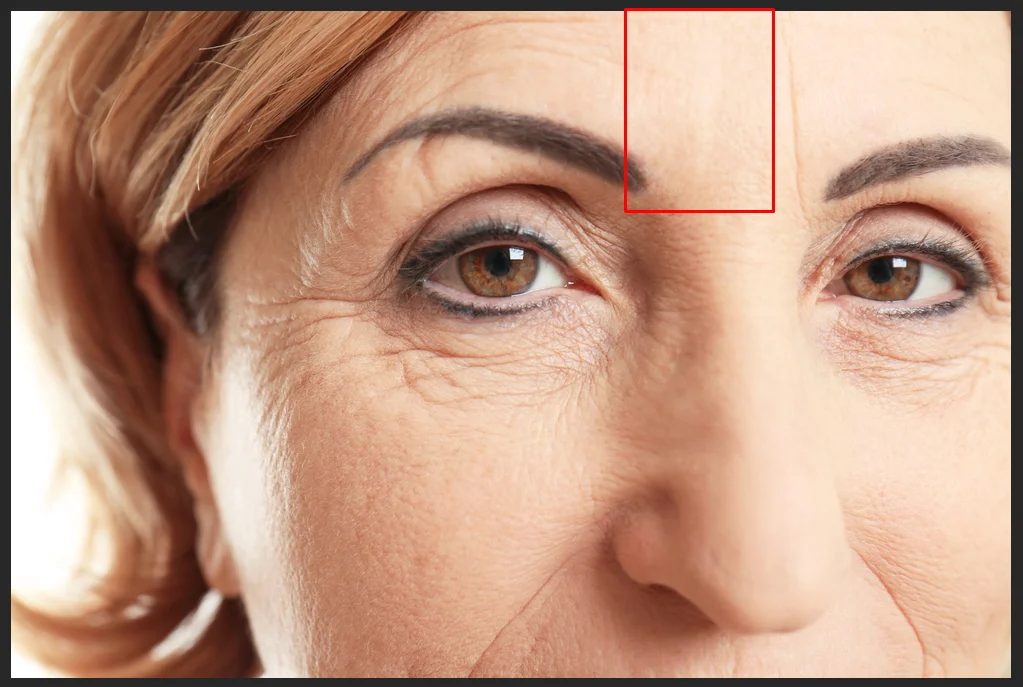
Step 10: Gradually Cover Wrinkles in Small Portions
Using “Alter / Option” to select and “Left-clicks” to replace—remove the entire wrinkle.
Work methodically, covering wrinkles in small portions by sampling different skin textures and applying them to each wrinkle individually.
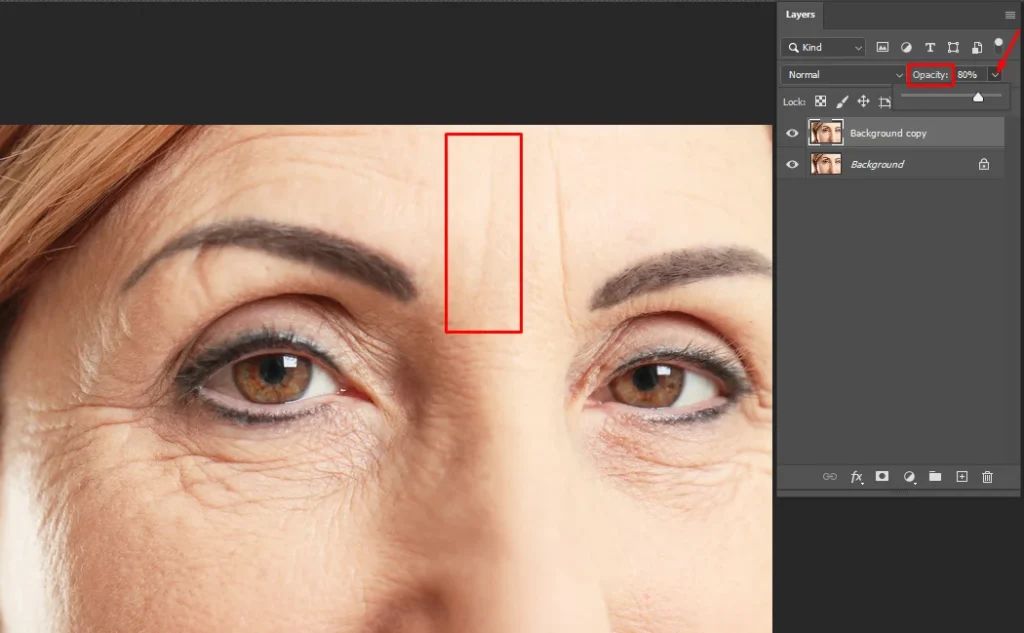
Step 11: Decrease the “Opacity” of the “Background Copy”
Cover all the wrinkles remaining wrinkles in the same process. Finally, decrease the “Opacity” to make the wrinkle slightly visible.
Adjust the opacity of the background copy layer to fine-tune the intensity of the wrinkle-softening effect, ensuring it looks natural and not overly smooth.
Gain a deeper understanding of the method from the tips below when softening wrinkles in Photoshop.
6 Tips for Natural Wrinkle Reduction in Photoshop
These tips will help you soften facial creases in Photoshop while keeping your edits looking natural and realistic.
- Keep It Natural
When you’re editing wrinkles, try not to go overboard and remove them completely. Instead, aim for a more subtle approach that softens the age lines without making the person look unnaturally smooth. You want to maintain their natural appearance as much as possible.
- Work in Small Portions
Rather than trying to fix all the wrinkles at once, focus on one small area at a time. This allows you to be more precise with your edits and ensures that the changes blend seamlessly with the rest of the image.
- Use Alter for Texture Selection
There’s a handy trick called “Alt” (or “Option” on Mac) that lets you pick different skin textures to use in your edits. This helps you find textures that match the surrounding skin, so your edits look more realistic and blend in better.
- Experiment with Opacity
You can adjust how strong your edits are by changing the opacity of the layer you’re working on. If you lower the opacity, your changes will be more subtle, allowing some of the original texture to show through. It’s all about finding the right balance for your image.
- Practice Non-Destructive Editing
Always make your edits on a copy of the original image, rather than the original itself. This way, you can freely experiment without worrying about ruining the original. It also lets you go back to the original if you’re not happy with your changes.
- Zoom In for Precision
When you’re working on small details like wrinkles, it helps to zoom in on the image so you can see what you’re doing more clearly. This makes it easier to make precise edits and ensures that your changes look natural and seamless when you zoom out.
Closing Thoughts
You learned here a straightforward method for softening wrinkles in Photoshop while keeping things looking natural. Instead of erasing wrinkles entirely, we focused on toning them down to enhance the overall appearance without losing the subject’s character. Besides, following the step-by-step instructions and practical tips provided, you can achieve subtle yet effective results.
Explore our other blogs and tutorials to expand your Photoshop knowledge further. If this blog has been helpful to you or if you have any questions, we’re here to listen! Feel free to share your thoughts and experiences with us in the comments below. And if you or someone you know needs a professional image editing service provider—we’re just a message away. Our team is dedicated to making your good images better.
