
Creating a clipping mask in Photoshop lets you achieve precise edits without permanently altering your image. With clipping masks, you can selectively reveal content from underlying layers or apply adjustments only to designated parts of your image.
So, these are the steps that you can follow:
- Open a new document with “Ctrl / Command + N”.
- Create a new layer in the Layer Panel.
- Select “Layer 1” and go to Edit > Place Embedded to insert an image from your device.
- Press “Enter” to fix the image onto “Layer 1” as a Smart Object.
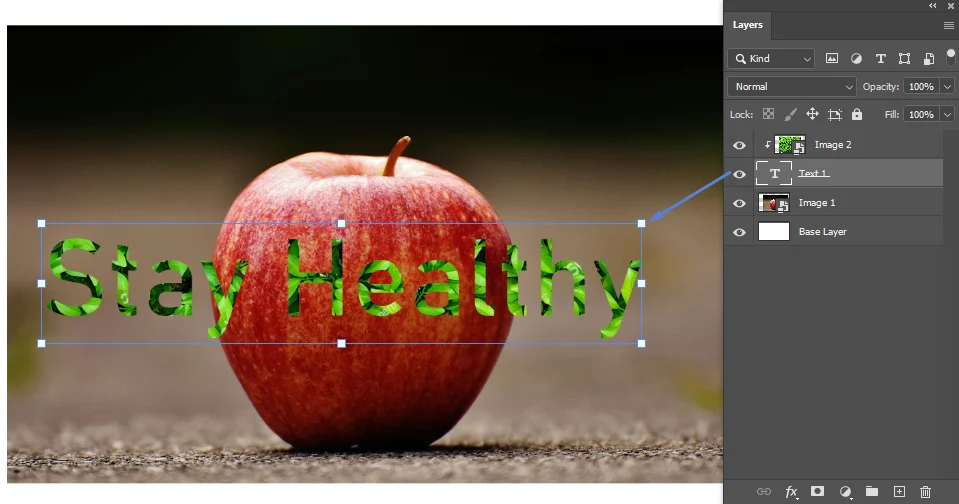
- Use the Text Tool to create a text layer by left-clicking on the image.
- Select all with “Ctrl / Cmd + A” and type or copy-paste your text, then press “Backspace”.
- Customize font, thickness, etc. from the Tool Options Bar.
- Create another new layer in the Layer Panel.
- Repeat the process to place another image on “Layer 1”.
- Press “Enter” to fix the image onto “Layer 1” as a Smart Object.
- Right-click on the image layer and choose “Create Clipping Mask”.
- Adjust layers and explore to refine your edit.
From basic edits, clipping masks offer a world of creative possibilities. You must have seen an image placing an image perfectly within a heart shape.
There are many more you can do—gradually revealing a hidden message through another picture, or fine-tuning adjustments like color correction on specific areas!
| This guide will equip you with the knowledge to master these advanced techniques in Photoshop. We’ll show you how to create them from shapes, text, and even other editing features. |
What is a Clipping Mask?
It’s a tool that uses the content and transparency information of one layer (known as the mask) to dictate the visibility of another layer (referred to as the clipped layer).
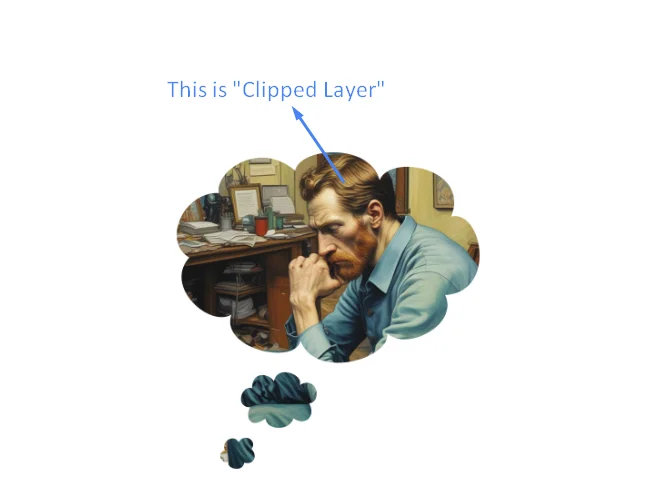
Essentially, it enables you to reveal specific areas of the clipped layer only where the mask layer has content.
An analogy would be cutting out a shape from a piece of paper and overlaying it onto another image – only the portions of the image that match the cutout shape become visible.
How Does a Clipping Mask Exactly Work in Photoshop?
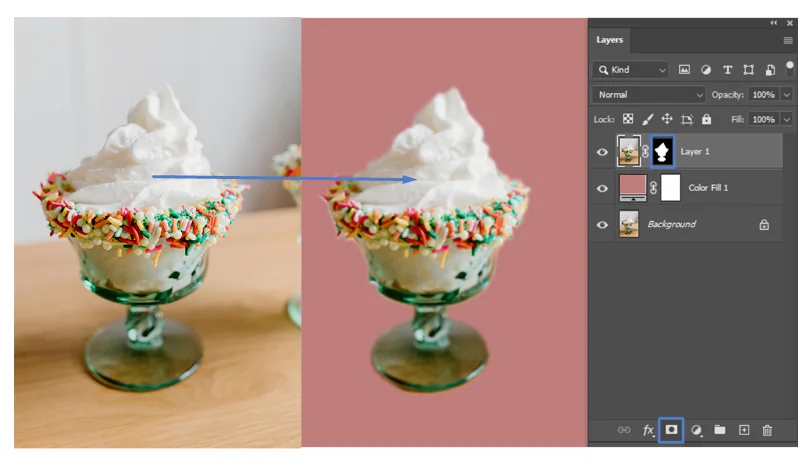
Now, let’s say you have two layers in Photoshop—one with a background image and another with a solid color. By creating a clipping mask using the solid color layer, you gain control over which parts of the background image are visible through the color layer.
In this setup, regions on the color layer that are entirely white will reveal the entire background image underneath.
Conversely, if you are using layer masks, areas on the color layer that are black will completely conceal the background image.
Here, grayscale values in between create a transparency effect, partially revealing the background image.
Since, clipping masks and layer masks are both tools used to control what parts of an image are visible, but they work differently. On that note, let’s compare and contrast clipping masks and layer masks:
Similarities With Layer Mask
- They both determine which parts of an image are visible and which are hidden.
- Both use masking techniques to achieve their effects.
So, how are they unique? Also, when do you use them? The differences can show you that.
Differences with Layer Mask
Choosing between them depends on the specific requirements of the design project and desired outcomes.
Look at the table below:
| Aspect | Clipping Masks | Layer Masks |
|---|---|---|
| Functionality | Use another layer as a mask. | Use grayscale values on the same layer as the mask. |
| Editing Process | Modify the mask layer directly. | Edit the mask directly, separate from the image. |
| Control Precision | Offer precise control, especially with complex shapes or text. | Also offers control, but may be slightly less precise. |
| Application | Useful for non-destructive editing and precise adjustments. | Versatile for various editing tasks. |
| Creative Freedom | Allow for creative effects like photo collages, hidden element reveals, and selective edits. | Offer creative freedom but may require more manual adjustments. |
| Flexibility | Highly flexible; edits remain non-destructive. | Flexible but may require more manual adjustments. |
Clipping masks empower designers to maintain consistency, quality, and creativity throughout the design process—ultimately improving productivity and design. Find more about the benefits and uncover much more information regarding creating clipping masks in Photoshop.
4 Benefits of Using Clipping Masks in Design Projects
Clipping masks offer designers a versatile toolkit for ease, precision, and creative exploration. Here are the ways one can take advantage of clipping masks.
Clipping masks allow designers to maintain the integrity of their original images while making edits. This means you can experiment freely without worrying about permanently altering your work.
For example, if you’re designing a poster and decide to change the background color behind a subject, you can easily do so with a clipping mask without affecting the subject itself.
- Precise Control
Once again, unlike layer masks, which grayscale values can limit, clipping masks offer precise control over where an image or adjustment is applied.
This level of precision is particularly valuable when working with complex shapes or text.
Let’s say you’re designing a logo and want to overlay a texture onto a specific part of the design.
With a clipping mask, you can ensure that the texture only appears where you want it, maintaining crisp edges and precise placement.
- Easy Adjustments
Clipping masks make it simple to apply adjustments to specific areas of an image or design element. Whether you’re fine-tuning the exposure of a photograph or adding a gradient effect to a shape, clipping masks allow you to target your edits precisely.
This saves time and effort by avoiding the need to manually select and mask individual elements, especially in projects with multiple layers or complex compositions.
- Creative Possibilities
Perhaps the most exciting aspect of clipping masks is their potential for creativity. By combining different images, shapes, and textures, designers can craft visually striking compositions that tell a story or create a specific mood.
For instance, creating a magazine cover where the headline seamlessly integrates with the background image using a clipping mask. This technique not only adds visual interest but also reinforces the overall theme or message of the design.
In many design fields, including graphic design, illustration, and photography, proficiency in using clipping masks is considered a fundamental skill. Being able to demonstrate competence in this area can enhance one’s professional reputation and credibility. So, knowing how to create one is essential. And I am here to help you with that.
Essential Steps Before Creating Clipping Masks in Photoshop
Before seeing how to make a clipping mask, it’s important to prepare your workspace and layers within Photoshop properly. We’ll walk through the necessary steps to set up your document and organize your layers for seamless masking.
Step 1: Opening Photoshop and Selecting the Desired Image
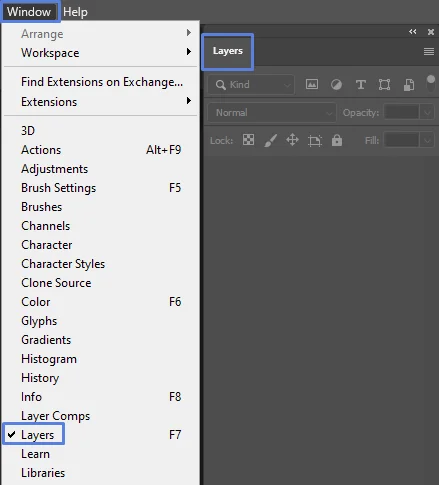
Launch Photoshop on your computer: Open the image you want to work with by going to File > Open and selecting the desired image file.
Ensuring Layers Panel Visibility: Make sure the Layers panel is visible by going to Window > Layers. This will allow you to manage and organize your layers effectively.
Step 2: Organizing the Image and Layers for Clipping Mask Application
Organizing Layers: Arrange your layers in a logical order to make the editing process smoother. You can rename layers for clarity by double-clicking on the layer name.
Creating Layers for Masking: Create new layers for the elements you want to use as clipping masks. These can be shapes, text, or images that will define the visibility of other layers.

All set! Now, I show how you can try out clipping masks in Photoshop including advanced edits.
Easy Steps for Creating Clipping Masks in Photoshop
By following these step-by-step directions, you can effectively prepare your workspace, create clipping masks, and utilize different shapes and adjustment techniques in Photoshop for your projects.
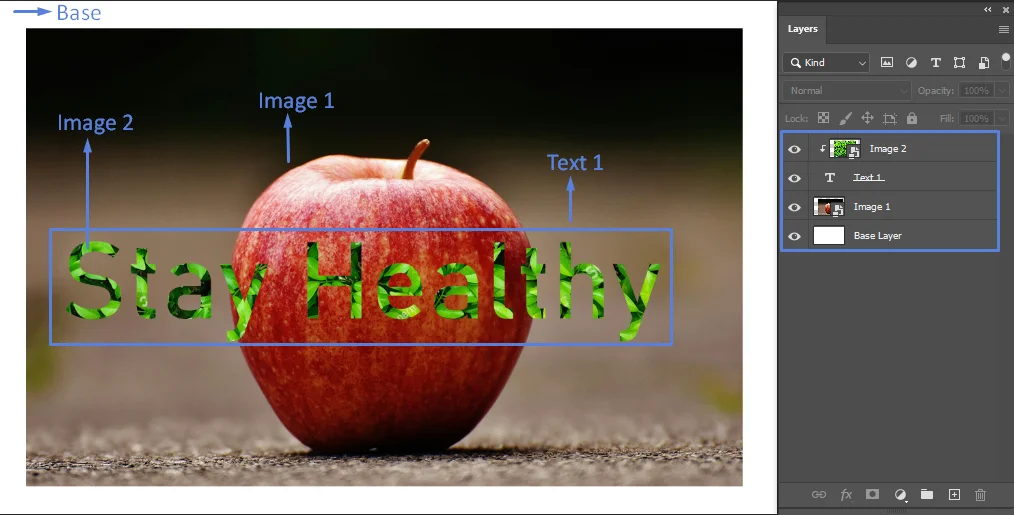
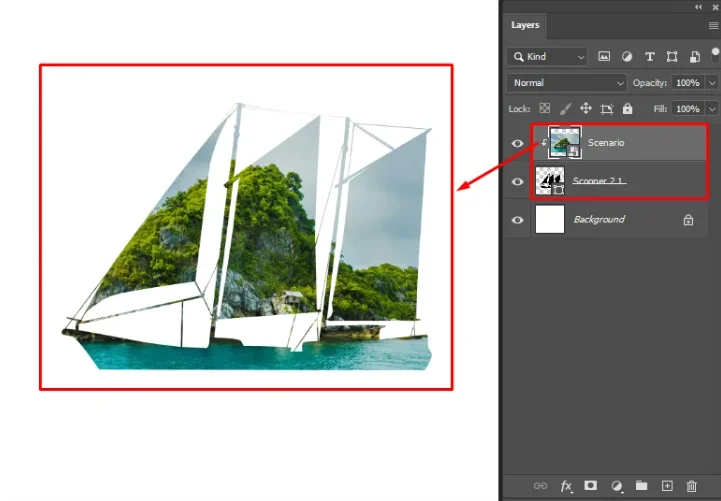
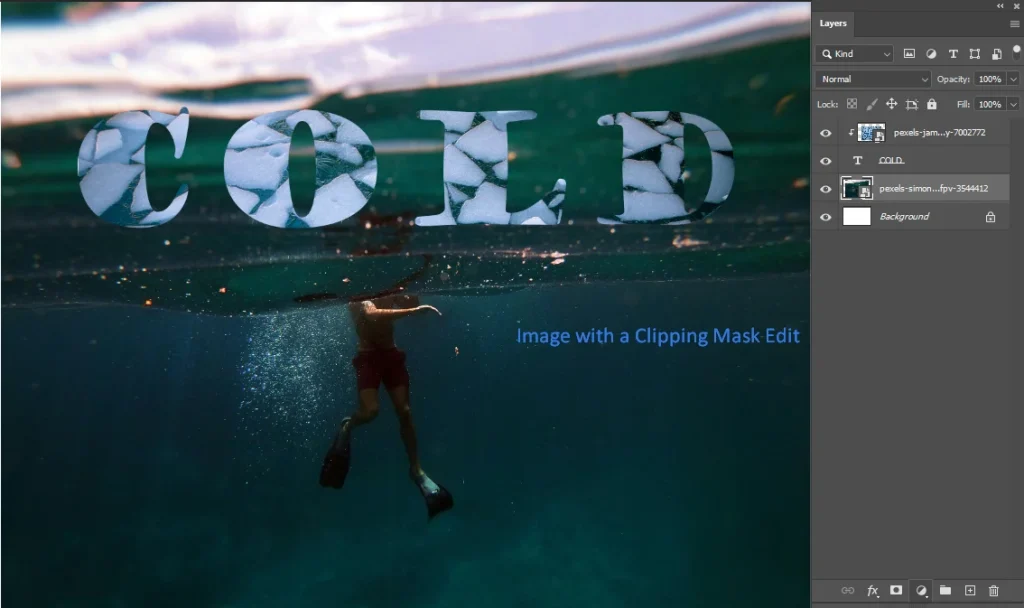
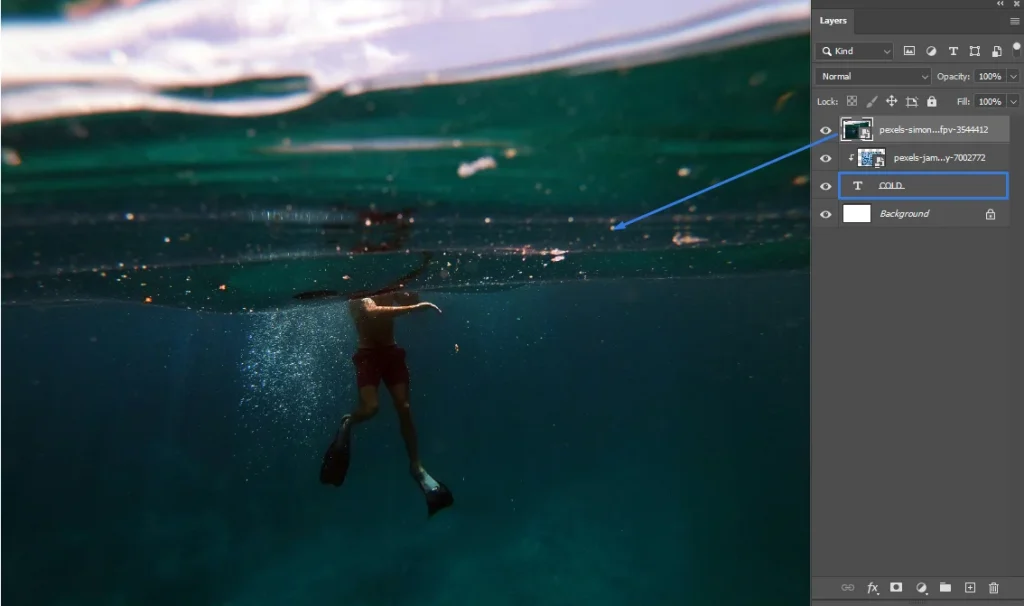
1. Selection of the Base Layer
Identify the base layer that you want to reveal based on the content of another layer.
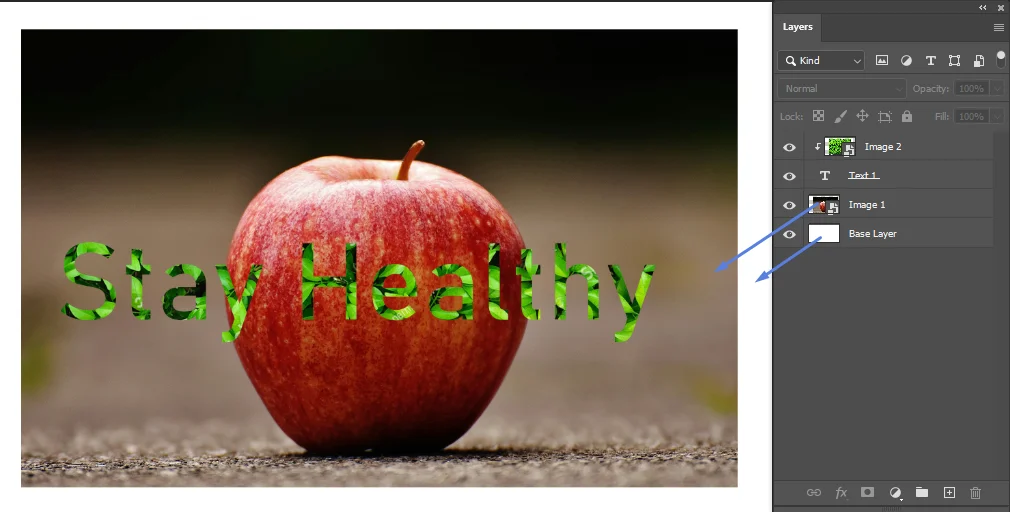
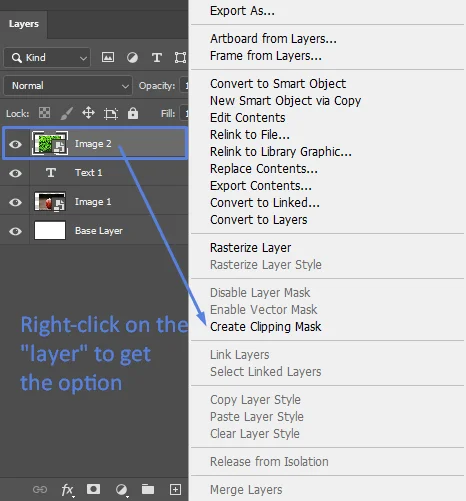
2. Addition of the Clipping Mask
Place the layer you want to use as the mask directly above the base layer. Right-click on the mask layer and choose “Create Clipping Mask” to apply the clipping mask effect.
Create Clipping Mask Using Different Shapes
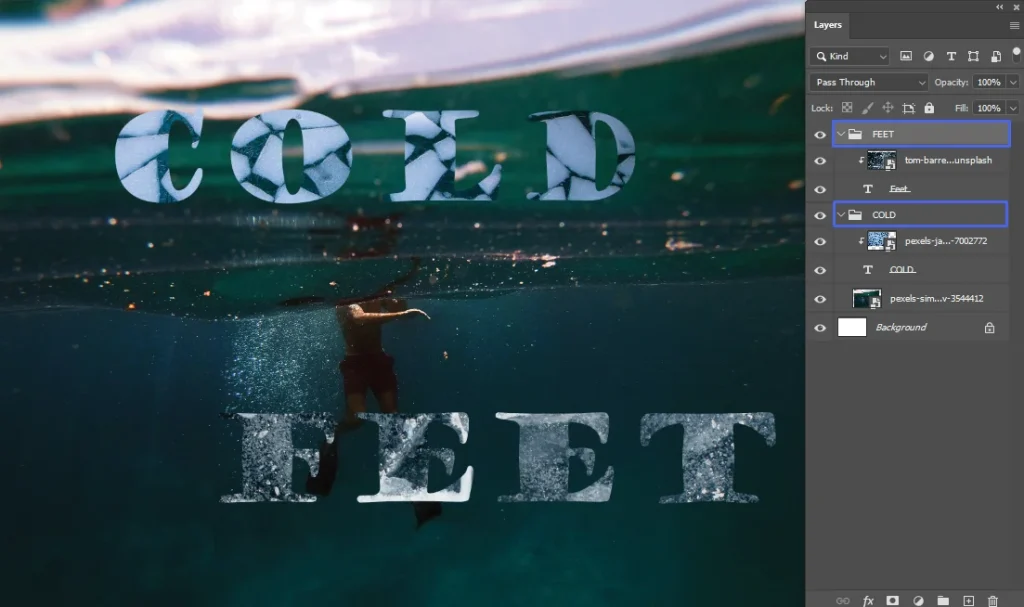
1. Using Text Layers
Create a text layer with the text you want to use as a mask. Follow the same steps as above to apply the text layer as a clipping mask.
I have talked about filling shapes with an image in my previous blog. Check this as well to learn further.
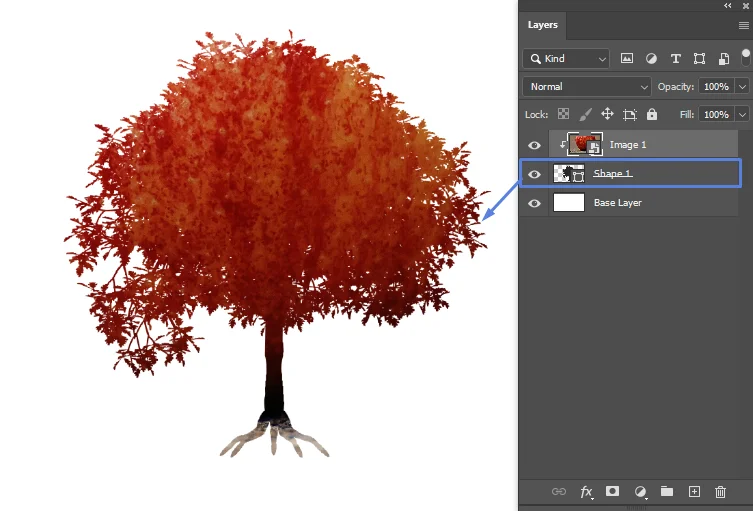
2. Using Custom Shapes
To use custom shapes as clipping masks, create a shape layer using the shape tools in Photoshop. Position the shape layer above the base layer and apply it as a clipping mask.
For more advanced image editing options like deep etching, check out our deep etching service.
Adjustment and Editing Techniques for Clipping Masks
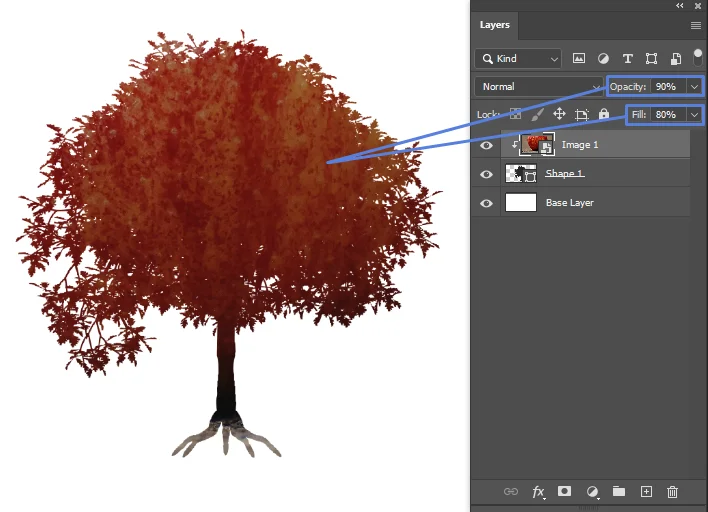
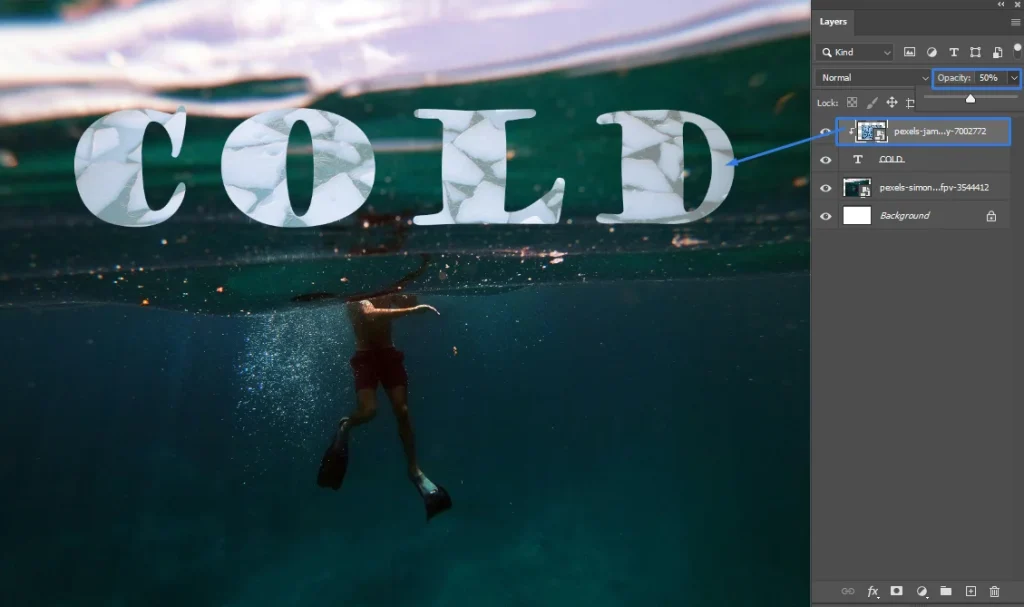
1. Modifying Opacity and Fill Settings
Adjust the opacity and fill settings of the layers involved in the clipping mask to control transparency and blending.
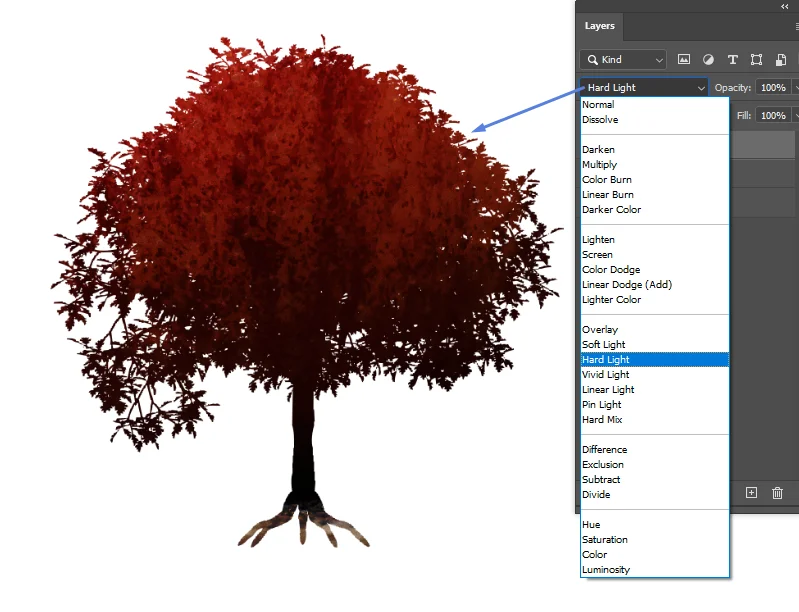
2. Applying Blending Modes
Experiment with different blending modes on the layers to achieve various effects and enhance the overall look of your composition.
Now that we’ve covered the basics of creating clipping masks, let’s move on to something more advanced: working with multiple layers and masks. Keep reading and see all the possibilities for your editing.
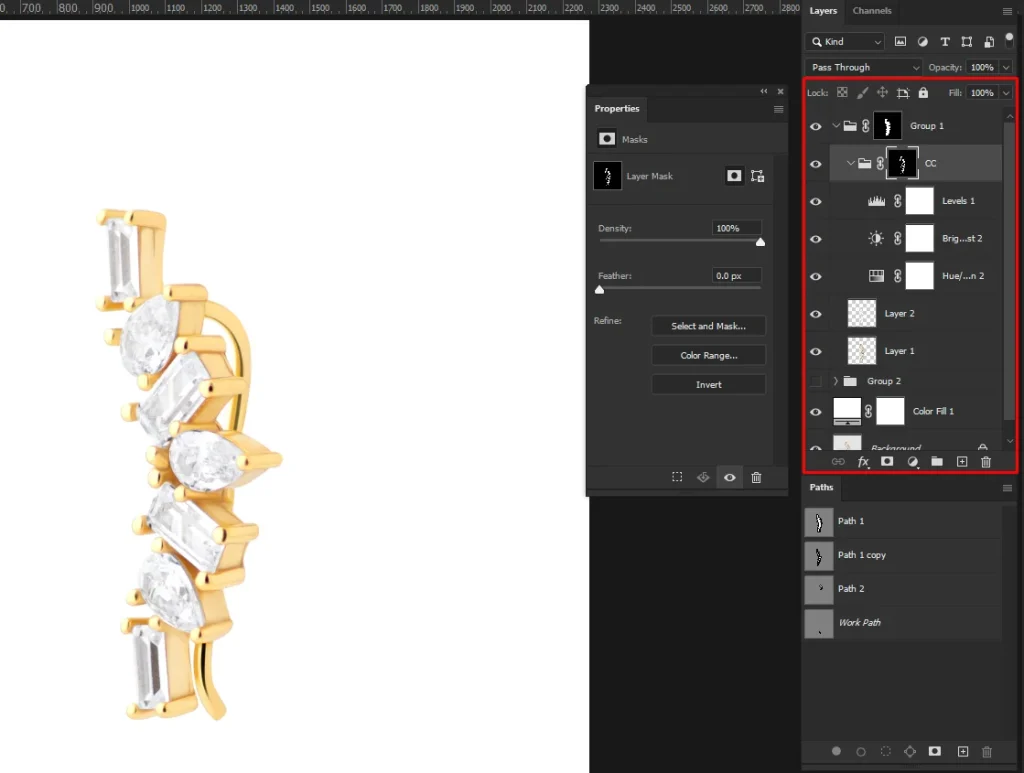
Next-Level Editing: Multiple Layers and Masks
When you’re working on a project in Photoshop, using multiple layers and masks helps you be precise and creative. According to Phlearn, think of layers as different sheets of transparent paper stacked on top of each other.
Clipping masks are like windows through which you can see parts of the layers below them. By using these together, you can create complex designs and control which parts of your image are visible.
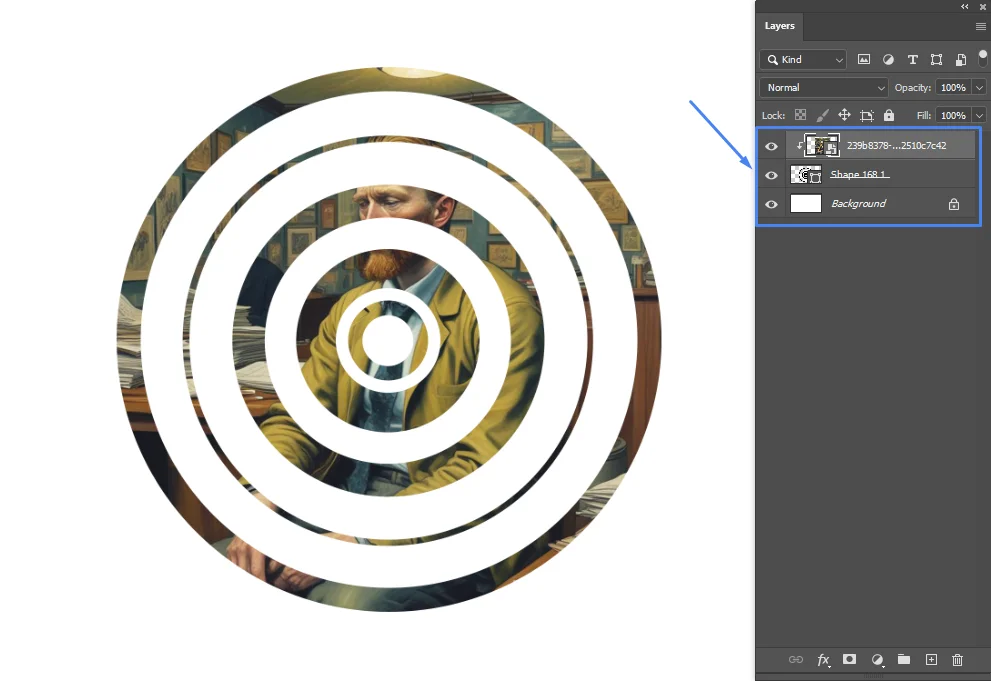
Nested Clipping Masks
Nested clipping masks let you get really detailed with your designs. If you’re making a collage and you want one picture to blend perfectly into another. Nested clipping masks allow you to clip layers within layers, giving you control over exactly how each part of your collage looks.
This tutorial below shows you how to use lots of layers. You’ll learn how to put layers on top of each other, hide parts you don’t need, and mix them together to make cool effects. Easily Stack, Mask, Blend Multiple Layers in Less Than 2 Minutes
Clipping Groups
Clipping groups help keep things organized. Let’s say you’re working on a design with lots of text, shapes, and images. You can group them separately. This way, you can apply effects or changes to one group at once.
Let’s move on to Gradient and Pattern Overlays. These additions can add depth and character to our designs, turning them from simple compositions into engaging visual experiences when used carefully.
Getting Creative with Gradient and Pattern Overlays
Gradient helps you add depth and dimension, while patterns can create texture and visual interest. They let you add things like smooth color transitions or textured patterns to specific parts of your images, making them more interesting and eye-catching.
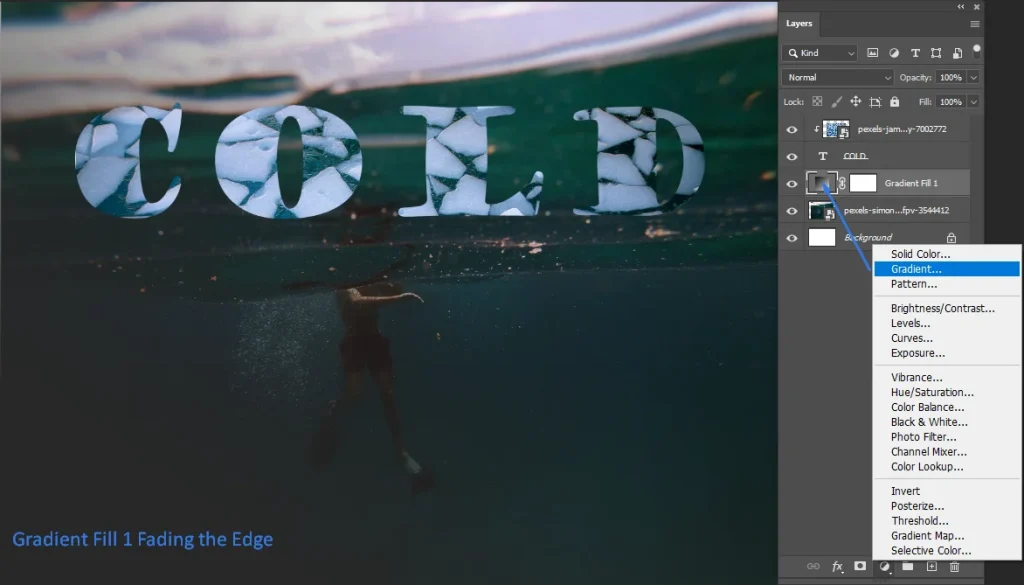
Gradient Overlays
Gradient overlays help you add depth and dimension to your images. For example, you can use a gradient overlay to make the edges of a photo gradually fade away, drawing attention to the main subject in the middle. You can adjust the colors and strength of the gradient to get the look you want.
| While gradients and patterns offer creative possibilities, you can take clipping masks to a whole new level by using compound paths from Illustrator. You can take a look at this technique in our blog: Understand Compound Path Illustrator & Make A Clipping Mask—to create intricate shapes for your clipping masks, giving you even more control over how your image elements blend together. |
Pattern Overlays
Pattern overlays let you add textures and patterns to your designs. You can use them to give the text a cool texture or add interesting patterns to backgrounds. Mixing different patterns and blending options can give your designs a unique and striking look.
Knowing the basics of design, like using gradients and layers, is like building the foundation for your creative skills. It’s similar to learning the basics before diving into more complex tasks.
Once you feel comfortable with the basics, you can start experimenting with advanced effects. These effects add extra style and depth to your designs.
Building Blocks to Brilliance: Exploring Additional Effects and Filters
Photoshop has lots of extra features to make your designs even better. Things like drop shadows, embossing, and filters can add depth, texture, and style to your work, allowing you to get really creative.
Drop Shadows and Inner Shadows
Drop shadows and inner shadows make your designs look more realistic. For example, adding a drop shadow to a clipped image can make it look like it’s sitting on top of the background.
Inner shadows can add depth to the inside of shapes, making them stand out more.
Embossing and Beveling Effects
Embossing and beveling effects give your designs a 3D look. You can use them to make shapes and text look like they’re raised or carved into the surface. This adds a professional touch to your designs and makes them more visually interesting.
While mastering clipping masks, layers, and advanced effects is essential in Photoshop, it’s equally important to address common issues that may arise. Learning how to troubleshoot these problems ensures a smoother design process.
Transitioning from foundational skills to problem-solving equips you with the expertise to overcome obstacles that may arise in your creative journey.
Troubleshooting Common Issues and Errors
Sometimes things don’t work as expected when you’re working with clipping masks. Therefore, knowing how to fix common problems can save you time and frustration.
Issue 1: Clipping Mask Not Working
If your clipping mask isn’t doing what you want it to, check the order of your layers. Make sure the layer you want to clip is on top of the one you want to clip it to. Also, look for any hidden masks or settings that might be causing problems.
Issue 2: Unexpected Clipping Results
The transparency of the layer you’re clipping to affects how your clipped content looks. If things aren’t turning out the way you want, try adjusting the opacity of the base layer to see if that helps.
Issue 3: Editing a Clipped Layer
If you need to make changes to a clipped layer, you can release the clipping mask. Just be careful, because this merges the clipped layer with the base layer, so any changes you make will affect both. It’s a good idea to save a copy of your work before you do this, just in case you need to go back.
Once you’ve learned how to use clipping masks, master layers, and masks, explore special effects, and fix common problems in Photoshop, the next step is to see how these skills work in real-life situations. Learning practical examples helps you understand how to use Photoshop for your projects. It’s like applying what you’ve learned in class to solve real problems. So, moving from learning the basics to practical examples makes you better at using Photoshop for your own designs.
Real-World Clipping Mask Edits
Clipping masks are like digital scissors that allow you to precisely control which parts of an image or design are visible. Here’s a closer look at how they can be used in various scenarios to add depth, creativity, and professionalism to your projects:
- Designing Social Media Graphics with Clipping Masks
Creating eye-catching social media graphics is important in today’s online world where images are key. Clipping masks are a helpful tool for this. Here’s how they can make your social media posts better:
Adding Text to Pictures
Instead of just putting text on a plain background, you can use clipping masks to add text to interesting pictures. For example, you can put a quote on top of a beautiful sunset picture or a bold title on a colorful background. This makes your posts more engaging and grabs people’s attention as they scroll through their feeds.
Highlighting Events
If you’re hosting an event or webinar, clipping masks can help you make eye-catching graphics to promote it. You can use them to combine event details with cool backgrounds or shapes. This makes your event stand out and gets people excited to attend.
Before and After Pictures
If your business involves transformations, like fitness coaching or home improvement, clipping masks can show off your work effectively. You can use them to overlay before-and-after images, so people can see the big changes you can make.
Mood Boards
For creative industries like fashion or interior design, clipping masks can help you create stylish mood boards. You can clip different images, textures, and colors onto a canvas to show off a certain style or theme. This helps inspire your audience and shows off your creativity.
- Creating Artistic Effects for Photographies
Clipping masks give you the power to make your photos unique and tell stories in a whole new way. Whether you’re tweaking colors, blending images, or creating something totally abstract, they’re your secret weapon for making amazing pictures.
Changing Colors
Each photo has its special parts and little details. Clipping masks let you tweak colors in specific areas without affecting the whole picture. For example, you can make the sky bluer or warm up someone’s face. This helps set the mood and vibe of your photos just right.
Combining Pictures
Ever seen those cool photos where two images blend together? That’s double-exposure photography. Clipping masks make it easy to merge portraits with landscapes or mix silhouettes with textures. It creates pictures that make people stop and think.
Making Artistic Creations
Abstract photography is about getting creative and making things that aren’t exactly real. With clipping masks, you can play around with shapes, textures, and colors to make unique and captivating pictures. Whether it’s a dreamy scene or a funky pattern, you can bring any idea to life.
- Designing Product Mockups and Packaging
When it comes to selling products, how you present them is important, whether it’s on a website or in a store. In fact, people are already seeking for best clipping path service for that. However, clipping masks make it easy to show off your designs in the best way possible:
Realistic Product Placements
With clipping masks, you can smoothly insert your product images into mockup templates. This creates visuals that look real and connect with your audience. So whether you’re selling a cool gadget or a yummy snack, clipping masks make sure your designs look great in every situation.
Creating Apparel Mockups
Fashion means showing off your style. With clipping masks, you can bring your clothing designs to life by putting logos, patterns, and graphics onto mockup templates. From trendy T-shirts to comfy hoodies, clipping masks help you bring your fashion ideas to life, making sure every detail looks just right.
Designing Custom Packaging Shapes
Packaging isn’t just about wrapping paper—it’s a big part of your brand. With clipping masks, you can get really creative, making custom shapes and textures that stand out. Whether it’s a fun box or a fancy label, clipping masks let you make packaging that grabs attention on the shelf and sticks in people’s minds.
Having explored the versatility and creativity of clipping masks in Photoshop, it’s clear they’re indispensable for designers. From basic edits to advanced compositions, we’ve seen how they enhance precision and creativity.
Now, let’s refine our skills with best practices for clipping mask workflows. These techniques will streamline your process, ensuring efficiency and consistency in your designs.
Best Practices for Clipping Mask Workflow
Efficiently managing clipping masks is essential for maintaining a smooth and productive design process. Here are some expert tips to help you make the most of this powerful tool:
- Naming and Sorting Layers for Efficiency
Good organization is key to a successful design project. Follow these steps to keep your layers neat and your work flowing smoothly:
Give Layers Names
Layers as the building blocks of your design. When you name each layer clearly and descriptively, it’s like creating a map for your creativity. Whether it’s labeling a layer “Product Image” or “Background Texture,” clear names help you find your way around your project and keep things tidy.
Group Similar Layers
When your designs get complex, grouping related layers together is critical. Whether you’re grouping elements by their function, design role, or importance, organizing layers like this makes your work easier to manage and keeps the Layers panel less cluttered.
Use Different Colors for Layers
In a big project with lots of layers, color coding is a powerful tool. Assigning different colors to layers based on their type or importance helps you quickly spot and handle specific elements in your design.
For example, you might use green for images, blue for text, or red for adjustments. Using colors like this keeps your workflow smooth and organized.
- Tips for Avoiding Losing Your Work
Losing hours of hard work to a technical problem is the last thing you want. Here’s how to keep your progress safe and your sanity intact:
Save Often
It’s a simple but smart rule: save your work early and save it frequently. Whether you’ve had a stroke of genius or just made a small adjustment, get into the habit of saving regularly.
By doing this, you reduce the risk of losing data and ensure that your progress is always protected.
Use Version History
Creativity can take you on unexpected journeys. With Photoshop’s version history feature, you can explore different paths without fear of losing your way.
By keeping track of changes and storing previous versions of your project, version history lets you experiment, refine, and evolve your designs confidently.
Try Autosave
In a fast-paced creative environment, time is precious. With Autosave, you can focus on your creativity without worrying about manual backups.
Whether you set autosave intervals or adjust backup preferences, Autosave keeps your workflow smooth and your projects safe from harm.
- Keeping Design Intent and Objectives in Mind
At the heart of every great design is a clear purpose and vision. Here’s how to stay focused and ensure your clipping mask usage aligns with your design goals:
Define Your Project’s Purpose
Before you start being creative, take a moment to understand what your project is all about. Whether it’s promoting a product, telling a story, or stirring up emotions, knowing your goals gives you a roadmap for your design journey.
Keep Things Simple
In design, less is often more. While clipping masks can do a lot, try not to go overboard with too many layers and masks. Instead, focus on keeping things clear, practical, and user-friendly, emphasizing substance over flashiness.
Guide the Viewer’s Eye
Design is about directing attention and conveying messages. With clipping masks, you can highlight important elements and create a visual hierarchy in your designs. Whether it’s showcasing a product, leading the eye through information, or evoking feelings, smart use of clipping masks can make your designs more impactful and effective.
After mastering clipping masks for your edits, you might want to enhance your images further by making them interactive. Learn how to add hyperlinks to your JPEGs in our detailed guide here.
Conclusion
In this guide, we’ve explored how to create a clipping mask in Photoshop and how they can take your designs to the next level.
As you begin your journey with clipping masks, don’t forget to practice and experiment. If you’re passionate about graphic design and Photoshop, keep learning! This guide is just the start. Explore our other resources to deepen your understanding of Photoshop and unlock even more creative possibilities.
We’d love to hear from you! Share your experiences with clipping masks – how have they improved your designs? What challenges have you faced, and how did you overcome them?
