
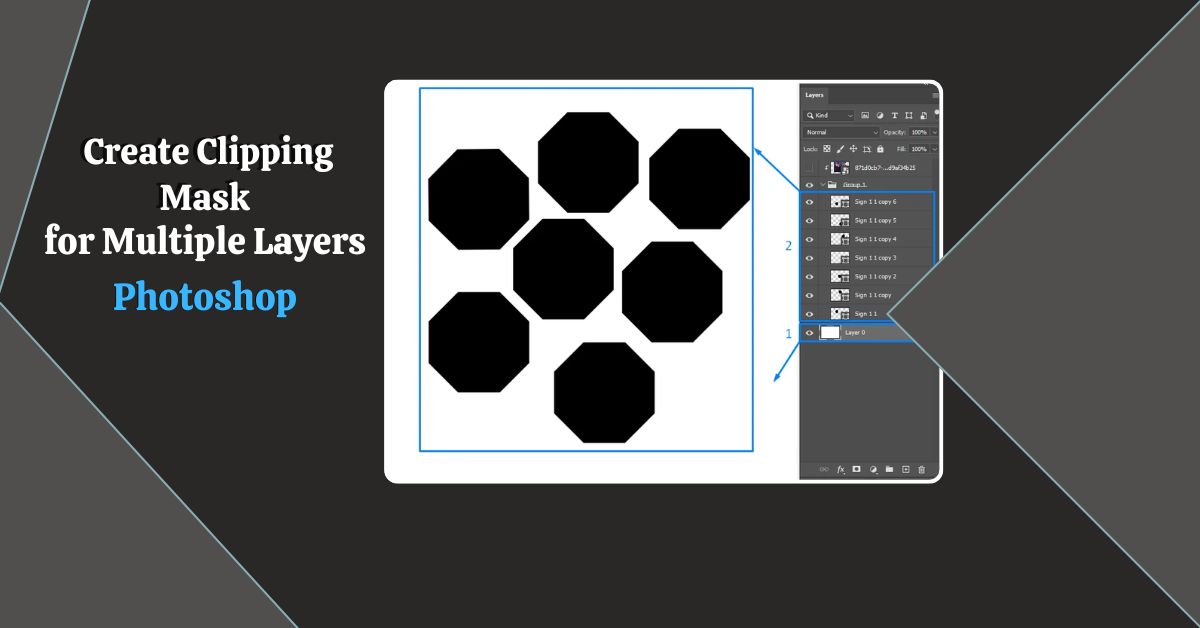
If you have multiple layers that need to be clipped to the same element, it can be tedious to apply the clipping effect to each layer individually.
Therefore, creating clipping masks for multiple layers in Photoshop improves your workflow.
So, my basic direction for you to create clipping masks for multiple layers in Photoshop is:
- Prepare all the layers (Shape or Text Layers).
- Select all the layers except the “Base Layer” & press “Ctrl / Cmd + G” to create a “Group” of the select layers.
- Select “Base Layer”: “File > Place Embedded > Place > Enter”. Right-click on the “Base Layer” and Select “Create Clipping Mask”.
If you have a design project that contains different layers with different elements for clipping, this tutorial will show how to create a “Group” of those layers and apply them in just one click.
I will also guide you through a step-by-step process. Before, you must explore clipping masks further to see their uses and benefits.
How To Create Clipping Mask for Multiple Layers: With 3 Simple Steps
If you already know how to create a document, turn the background into a layer, and select the shape or text layer necessary. For the main edits, the following steps should help just fine.
Step 1: Prepare All the Layers
Turn the background into a layer. Next, add shapes or text layers.
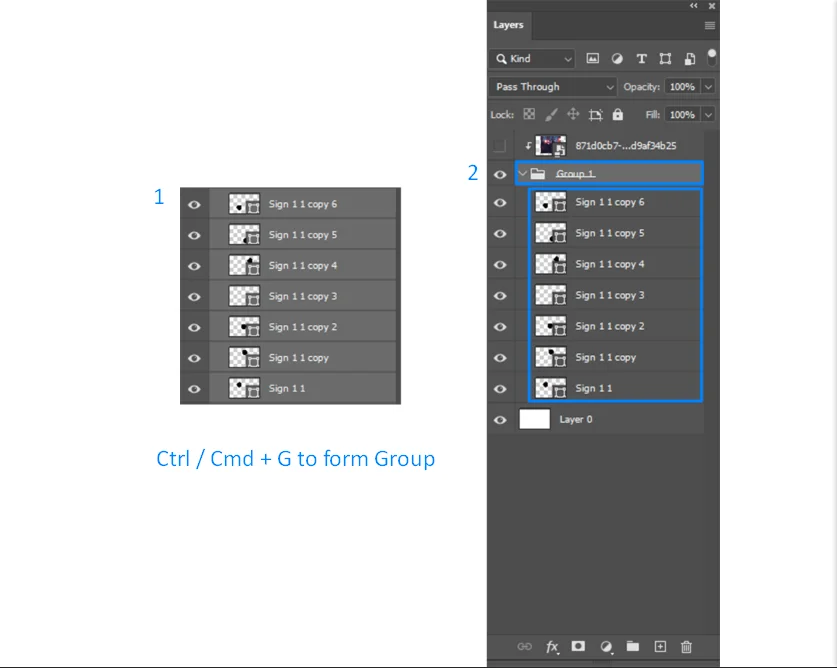
Step 2: Make a Group of the Layers for Clipping
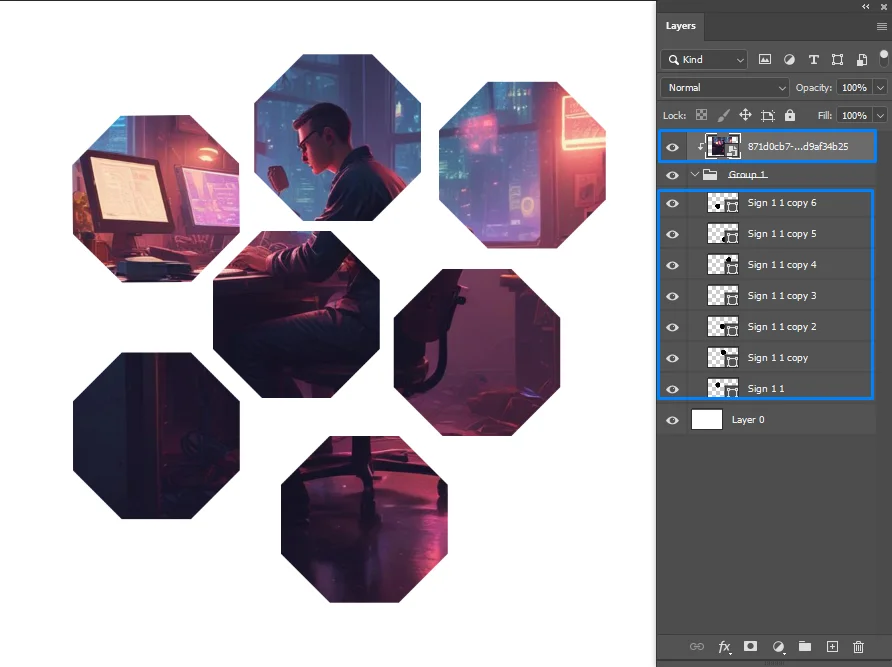
Press “Shift” and “Select” all the layers that contain shapes or texts. Then, press “Ctrl / Cmd + G” to form one “Group”.
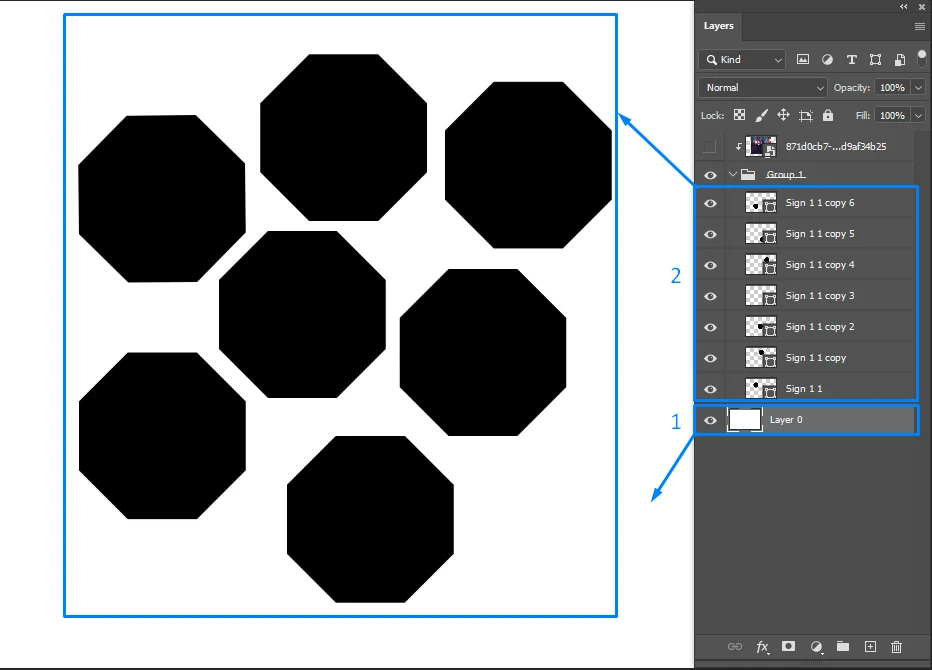
Step 3: Applying Clipping Mask to Multiple Layers
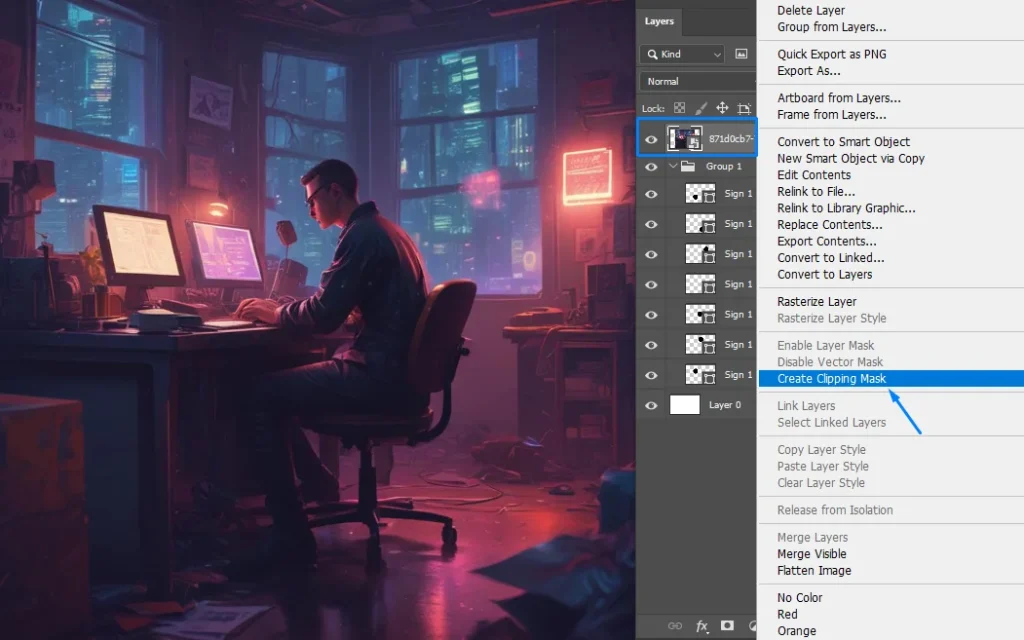
Open your target image and fix it: “File > Place Embedded > Place > Enter”.
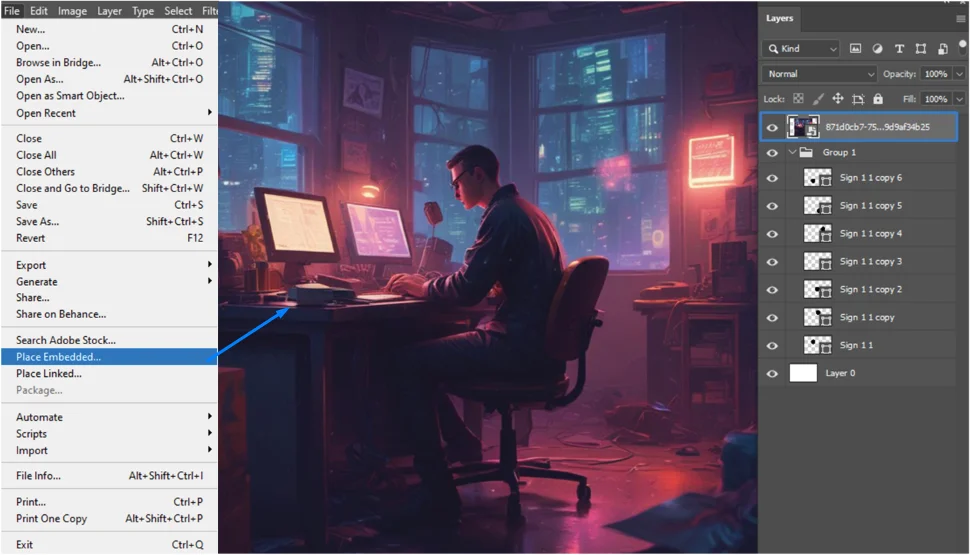
Select the target image layer and right-click. Select “Create Clipping Mask”.
In a blink, Photoshop will show you the image clipped like this:
Do check out the previous blog post on clipping masks, so you don’t stop at any of the stages. I explained the nitty-gritty, such as:
- Opening photoshop
- Layer visibility
- Advanced techniques
- Ideal practices
- Common errors
What Are the Differences: Single vs. Several Layer Masking
| Clipping Mask Technique | Description | Functionality | Example Scenario |
|---|---|---|---|
| Single Layer Clipping Mask | The traditional method involves a single grayscale mask to control the visibility of the layer directly above it. | Black conceals, white reveals, and shades of gray provide varying levels of transparency. | Merging a portrait and its background by gradually fading the edges using a single-layer mask. |
| Grouped Layer Clipping Masks (Multiple Layers) | Linking multiple layers together and applying a single mask to regulate their collective visibility. | Maintaining uniformity and consistency across various elements within a design. | Designing a collage with text layers and image elements ensures the overall shape of the collage remains cohesive by applying a clipping mask to the grouped layers. |
Knowing the differences between single and multiple-layer masking is the groundwork for complex image manipulation. Once you know the differences, learning how to choose the right clipping mask technique becomes essential.
Guidelines for Choosing the Right Clipping Mask Technique
It’s all about making your design process smoother. I have specified purposes with pros and cons. Here’s a breakdown to help you choose the right technique for your needs:
Single Layer Mask
Best for
- Simple selections: When you only need to isolate a basic shape or object.
- Non-destructive edits: Edits are applied to the mask, leaving the original layer intact for flexibility.
Pros
- Easier and faster for basic masking tasks.
- Less complex layer structure.
Cons
- Limited control over complex shapes: Can be challenging to achieve fine details.
- Destructive edits if you modify the mask directly (painting on black vs. white).
Multiple Layer Mask
Best for
- Complex selections: Isolating objects with intricate details or hair.
- Combining different masking techniques: Using tools like channels or paths for precise control.
- Creating feathered edges or gradients.
Pros
- Offers more precise control over the selection.
- Easier to refine and adjust specific areas.
- Non-destructive workflow by using separate mask layers.
Cons
- Requires more steps and can be complex for beginners.
- Creates a more layered document, which can be heavier.
Thumb Rules
Start with a single-layer mask: If you’re dealing with a simple object or want a quick selection, a single-layer mask is a good starting point.
Move to multiple layer masks: For intricate selections, feathered edges, or complex edits, using multiple layer masks offers greater control.
| Tip: You can also combine these techniques! You can start with a rough selection using a single-layer mask and then refine it with additional masks or tools within the mask itself. |
5 Benefits of Using Clipping Masks for Multiple Layers
You might know how handy single-layer clipping masks are for editing pictures in Photoshop. Well, you get to be even more creative using multiple layers of clipping masks.
To give you a hint, they’re like supercharged versions of single-layer masks. Here’s why:
- Making Complicated Changes Easily
If you’re working on a bunch of different layers and trying to blend them all together perfectly—a single-layer mask won’t be enough.
Because you need to adjust multiple layers at once. That’s where multiple layers clipping masks come in. You can group all your layers together and clip them into a single mask. Then, you can edit them all together without messing up your masterpiece.
- Keeping Things Organized
Let’s say you’ve got a group of text layers for a mind-blowing title! Instead of messing around with each text layer individually, you can group them all together and clip them into one mask. This keeps everything tidy and makes it way easier to manage your project.
- Tweaking Small Details
Sometimes, you need to make really specific changes to certain parts of your picture. With multiple layers of clipping masks, you can create different masks for different parts of your image. For example, you can fine-tune colors, brightness, or add effects exactly where you want them.
- Playing with Filters and Effects
Ever wanted to add cool filters or effects to just a certain part of your picture? With multiple layers of clipping masks, you can do just that. You can create different masks for different effects and apply them only to the areas you choose.
- Saving Time
At the end of the day, multiple layers of clipping masks are all about making your life easier and your projects more exciting. You can quickly adjust complex elements without breaking a sweat and try out different combinations of layers to see what looks best.
For anyone who loves getting creative in Photoshop—using multiple layers of masking is what you need.
7 Advanced Tips for Using Multiple Layer Clipping Mask
- Opacity Variation: Play with the opacity of the layers within your clipping mask hierarchy. Adjusting opacity can create subtle gradients and overlays, adding depth and dimension to your design.
- Layer Blend Modes: Combine clipping masks with different layer blend modes to achieve unique effects. Experiment with modes like Overlay, Soft Light, and Multiply to see how they interact with the layers beneath.
- Vector Shapes as Masks: Don’t limit yourself to using only raster layers as clipping masks. Vector shapes can also be used as masks, offering crisp edges and scalability. Use the “Create Clipping Mask” option with vector shapes or text layers to apply them as masks.
- Smart Objects: Convert layers into Smart Objects before applying clipping masks. This allows you to make non-destructive edits to the layers within the mask, preserving their original quality and flexibility.
- Layer Effects and Filters: Apply layer effects and filters to the layers within your clipping mask hierarchy. Experiment with effects like Drop Shadow, Gaussian Blur, and Gradient Overlay to enhance the overall look of your design.
- Adjustment Layers: Utilize adjustment layers within your clipping mask hierarchy to fine-tune colors, contrast, and tonal values. This enables you to make global adjustments without permanently altering your original layers.
- Masking with Channels: For precise masking, consider using channels to create complex selections. Load a channel selection as a mask for your layer or group, allowing for detailed control over which areas are visible.
Practical Examples and Applications
Considering the endless creative possibilities, here are a couple of exciting ways to utilize a multi-layer clipping mask:
Designing Multi-layered Text Effects with Clipping Masks
Text doesn’t have to be basic. Clipping masks let you embellish your typography in all sorts of exciting ways:
Texturize Your Text: Overlay a textured image like grunge or wood grain on your text layer. Use a clipping mask to show the texture only within the text, adding depth and interest.
Gradient Text: Create a smooth gradient on a separate layer and clip it to your text for a sleek color transition within the letters.
Add Depth with Shadows: Put a subtle shadow layer under your text and clip it. This way, the shadow will only show up behind the text, making it look 3D.
Creating Intricate Photo Manipulations with Multiple Layer Masks
Clipping masks take your photo editing to the next level. Here is how you can do it in your projects:
Swap Out Skies: Use a clipping mask to seamlessly replace the sky in your photo with a new one, transforming the landscape instantly.
Blend in Objects: Want to add something to your photo? Bring in an object image and clip it to a part of the photo, so it fits right in with the background.
Craft Collages: Mix and match photos to create unique collages. Use clipping masks to shape your images, layering them creatively for a dynamic look.
Designing Complex Graphic Compositions Using Clipping Masks
Clipping masks aren’t just for photos—they’re perfect for intricate graphic designs too:
Blend Shapes: Overlay vector shapes like logos or icons onto colorful backgrounds using clipping masks. It gives your design a polished, layered feel.
Shape Your Gradients: Combine gradients and clipping masks to add depth. Create custom shapes to reveal sections of vibrant gradients, adding a pop to your design.
Layering Shapes: Play around with different shapes and clipping masks to build intricate designs. It gives you precise control over how elements interact, making your design stand out.
Now, you need to polish your skills to work smarter and avoid mistakes. Refine your techniques by going through the section below.
Best Practices for Working with Multiple Layer Clipping Masks
Layer clipping masks are immensely useful if you want to control where your edits show up. But it can get tricky, especially when you start nesting them (putting one inside another).
- Layer Naming
Give your layers clear and descriptive names, especially the main layer that defines the clipping area. This makes it easier to understand what each part of your image does.
- Grouping
Put related layers together in groups, especially if you’re using lots of masks on one thing. This keeps everything neat and makes it easier to make changes later.
- Minimize Nesting
Try not to nest masks too deeply. It can get confusing fast. Look into using other tools like shapes or adjustment layers if things start to get too complicated.
- Clear Hierarchy
If you have to nest masks, make sure it’s easy to understand which mask goes where. Clip masks to the right layer so you know exactly what’s being affected.
- Non-Destructive Editing
Always edit the mask itself instead of changing the layer it’s clipped to. That way, you can make changes without messing up your original image.
- Mask Visibility
When masks get complex, hide the layers you’re clipping to so you can see the mask clearly and make adjustments without distraction.
Now that you’ve looked at tips for keeping your work organized and efficient, let’s tackle some common problems you might face.
Troubleshooting Common Issues and Errors
Clipping masks are great for controlling what parts of your layers show up in Photoshop, but sometimes things don’t go as planned. Here’s how to fix some common problems:
Making Sure Your Mask Works
The layer you want to use as a “mask” needs to be right below the layers you want to control. Think of it like a cookie cutter – it needs to be on top of the dough (layers) to make a shape.
If your clipped layers are completely hidden, it might be because your mask is backward. Black in the mask hides what’s below, white reveals it. Flip the colors (Image > Adjustments > Invert) if needed.
Also, sometimes The clipped layers might not show everything. Check the opacity of the masking layer itself (in the Layers panel). If it’s not at 100%, that could be dimming things down.
Mixing and Matching with Blend Modes
Some blend modes (e.g. Multiply) might not work perfectly with clipping masks because they affect the whole layer’s brightness, not just what’s shown. Try other blend modes (e.g. Normal) that consider the layers below.
Clipping masks and certain blend modes can sometimes cause unexpected color changes. Play around with the hue/saturation of the clipped layers or try a different blend mode to see if it fixes the issue.
Pro Tip: Make a copy of your layers first so you don’t mess with the original while experimenting.
Keeping Things Smooth
Loads of clipped layers can make Photoshop sluggish. Try merging similar layers or flattening groups before creating the clipping mask to make things run smoother.
Besides, the edges of the clipped content might look rough. Make sure the masking layer has a high enough resolution to handle the detail. You can also sharpen the mask itself after creating it.
In rare cases, complex clipping masks might cause some weird rendering issues. Try turning the masking layer into a regular layer (Layer > Rasterize > Layer) to see if that fixes it.
Warping up
Creating clipping masks for multiple layers in Photoshop can make editing complex designs much easier. They let you group layers together and control their visibility with just one mask. This is perfect for creating detailed selections, soft edges, and collages.
This guide will help you become a pro at using multiple-layer clipping masks in Photoshop. Just try out different techniques, keep your work organized, and solve any problems you run into. With a bit of practice, you’ll be making amazing designs in no time.
